3.1.2.1. Using a devcontainer
This is our recommended method for accessing the required tools. You can read more about devcontainers in the Part 1 notes.
Key points
You need to install the required software.
You need to download the pre-made files for this course from GitHub.
In VSCode you need to attach to the devcontainer.
In VSCode you need to open the workspace file.
The container runs Linux. You should follow the Linux instructions in the labs, even if your main operating system is Windows or macOS.
3.1.2.1.1. Setting up the tools and files
We will use the command line to install the required tools. We’ll learn about the command line more in Lab A. If you struggle to follow the steps, bring your personal device to the timetabled lab sessions and we will help you install the tools.
You only need to follow these steps once.
We have made a range of files that help define the settings used in the course. These are stored in GitHub Classroom. The GitHub Classroom link is on Canvas in the Week 2 module. Click on this link.
Sign in to GitHub. If you don’t already have an account, or an account using your University of Manchester email address, create one using the link that gets displayed. Follow the instructions on the website.
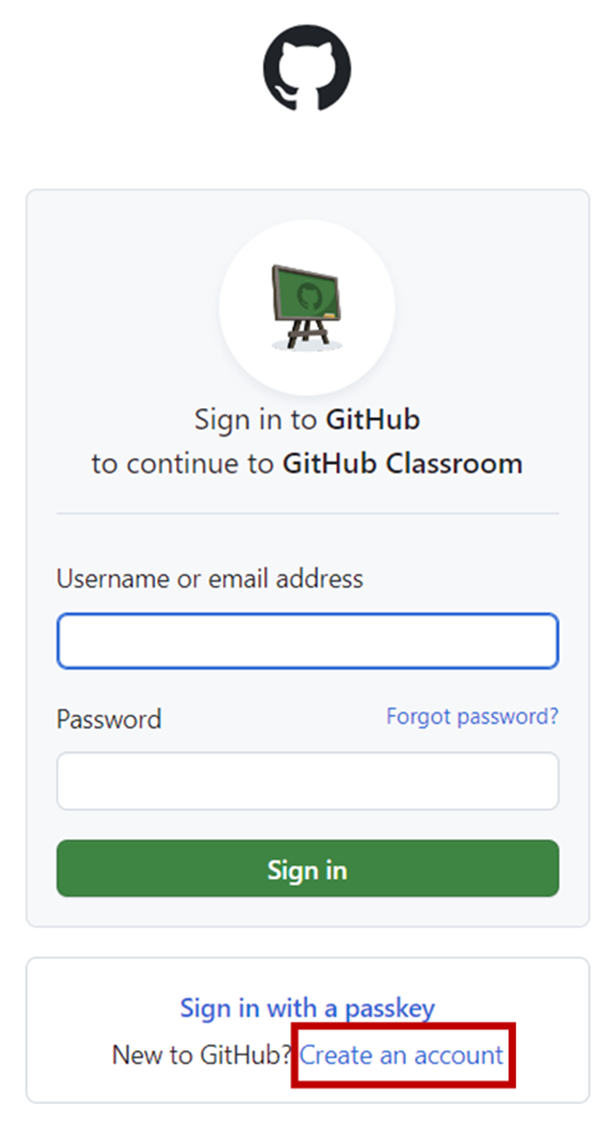
Screenshot of GitHub, software from Microsoft. See course copyright statement.
You can use any username that you would like, it doesn’t need to be your University one (and it is probably better if it isn’t, so you can keep your University username known only to you).
You must enter your University of Manchester provided email address. This is needed for everything to work correctly for the assignments.
After entering your details, GitHub will ask you to “Authorize GitHub Classroom”. Do this.
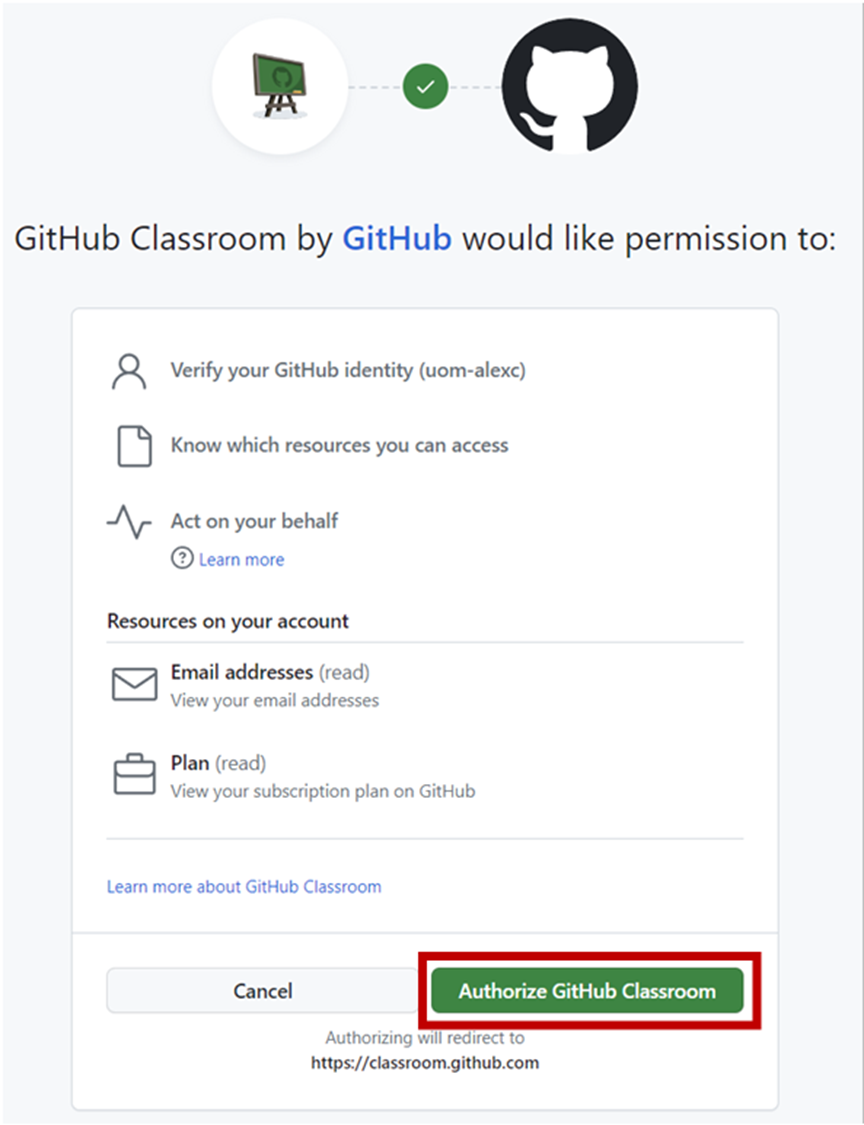
Screenshot of GitHub, software from Microsoft. See course copyright statement.
It can take a minute or two for everything to set up. You may be shown a waiting page. Wait a minute and then refresh the page in your browser.
Bug
Some people are presented with a
Repository Access Issuepage due to a bug in GitHub classroom.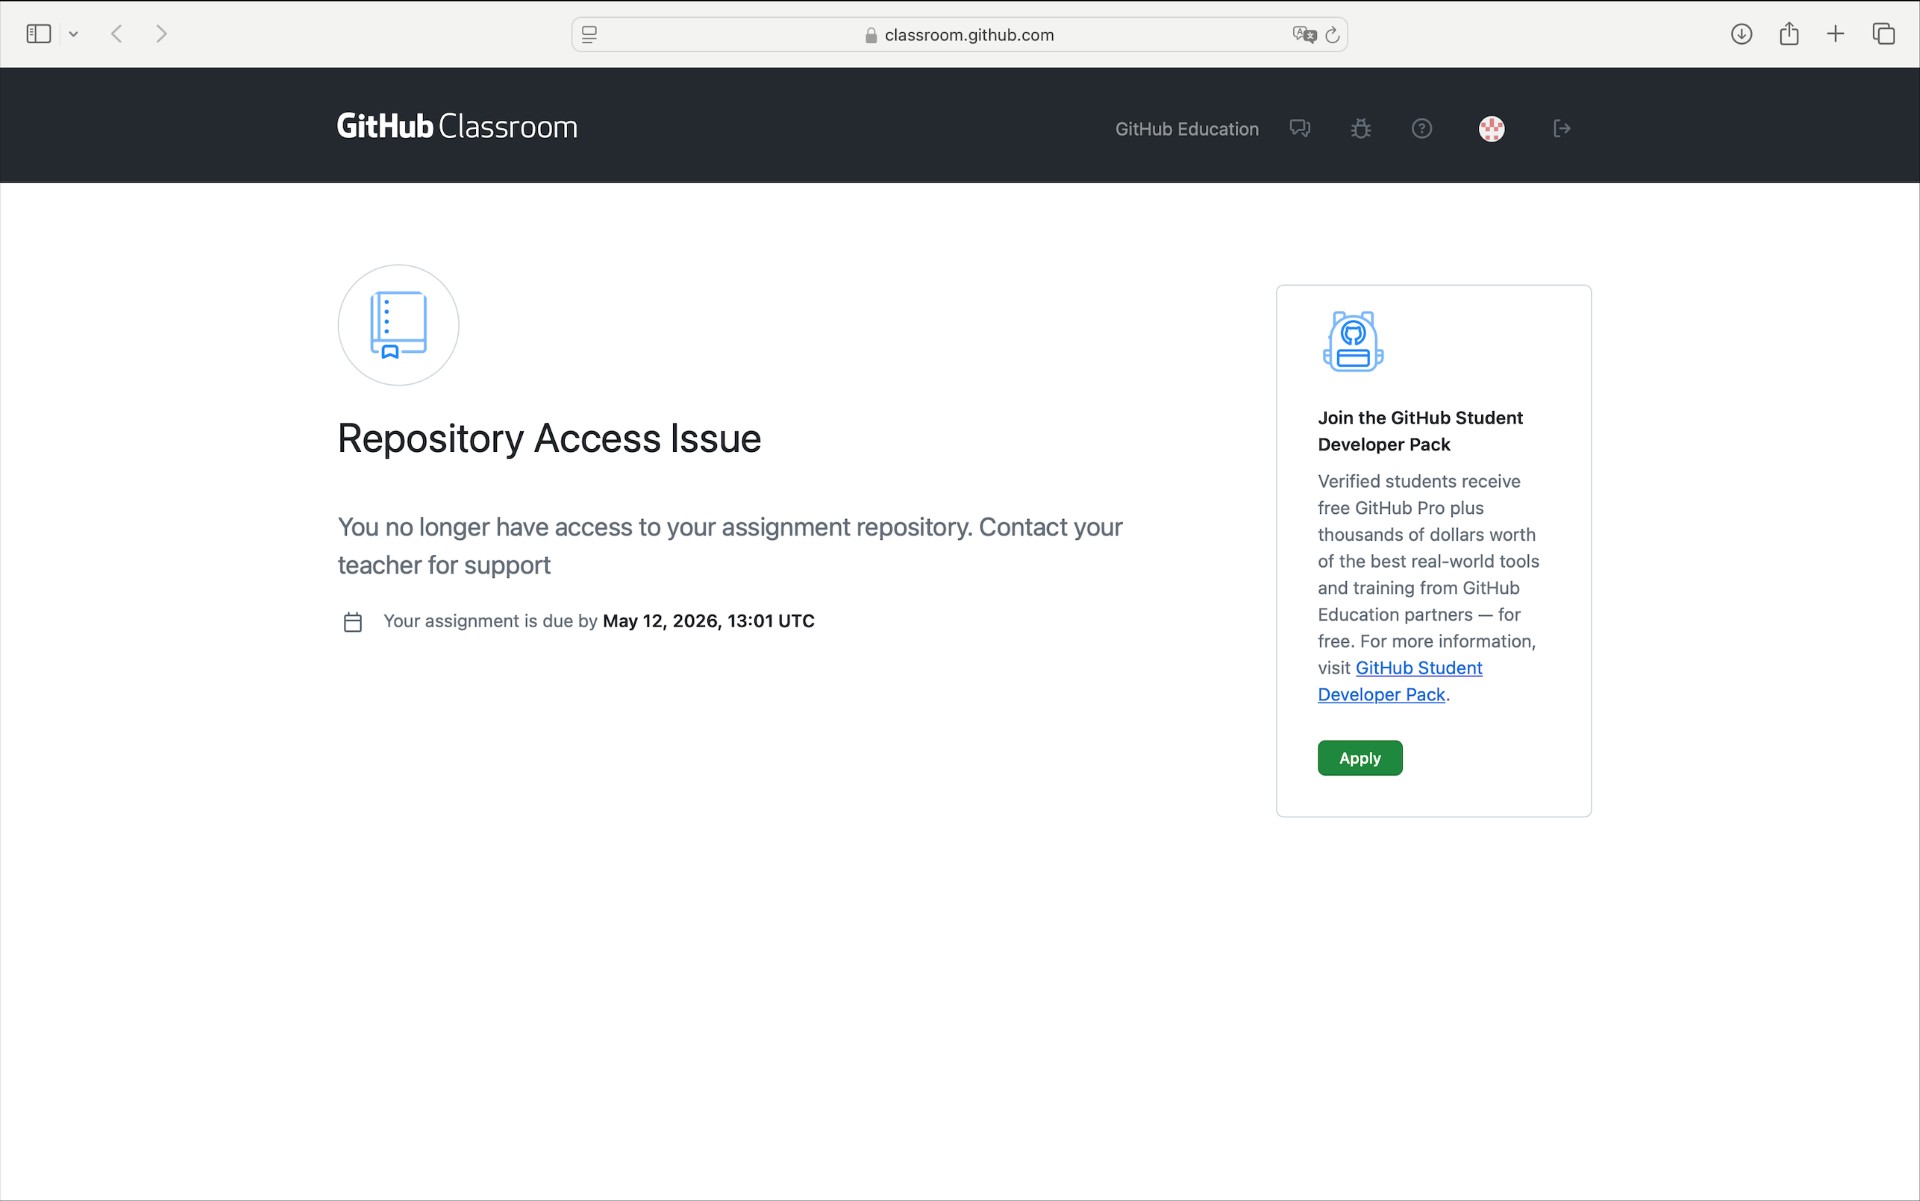
Screenshot of GitHub, software from Microsoft. See course copyright statement.
If you get this:
Go directly to your repositories page on GitHub: https://github.com/UOM-EEE-EEEN11202-LABS/labs-a-j-USERNAME where you replace USERNAME with your GitHub username.
Click on
Accept assignment.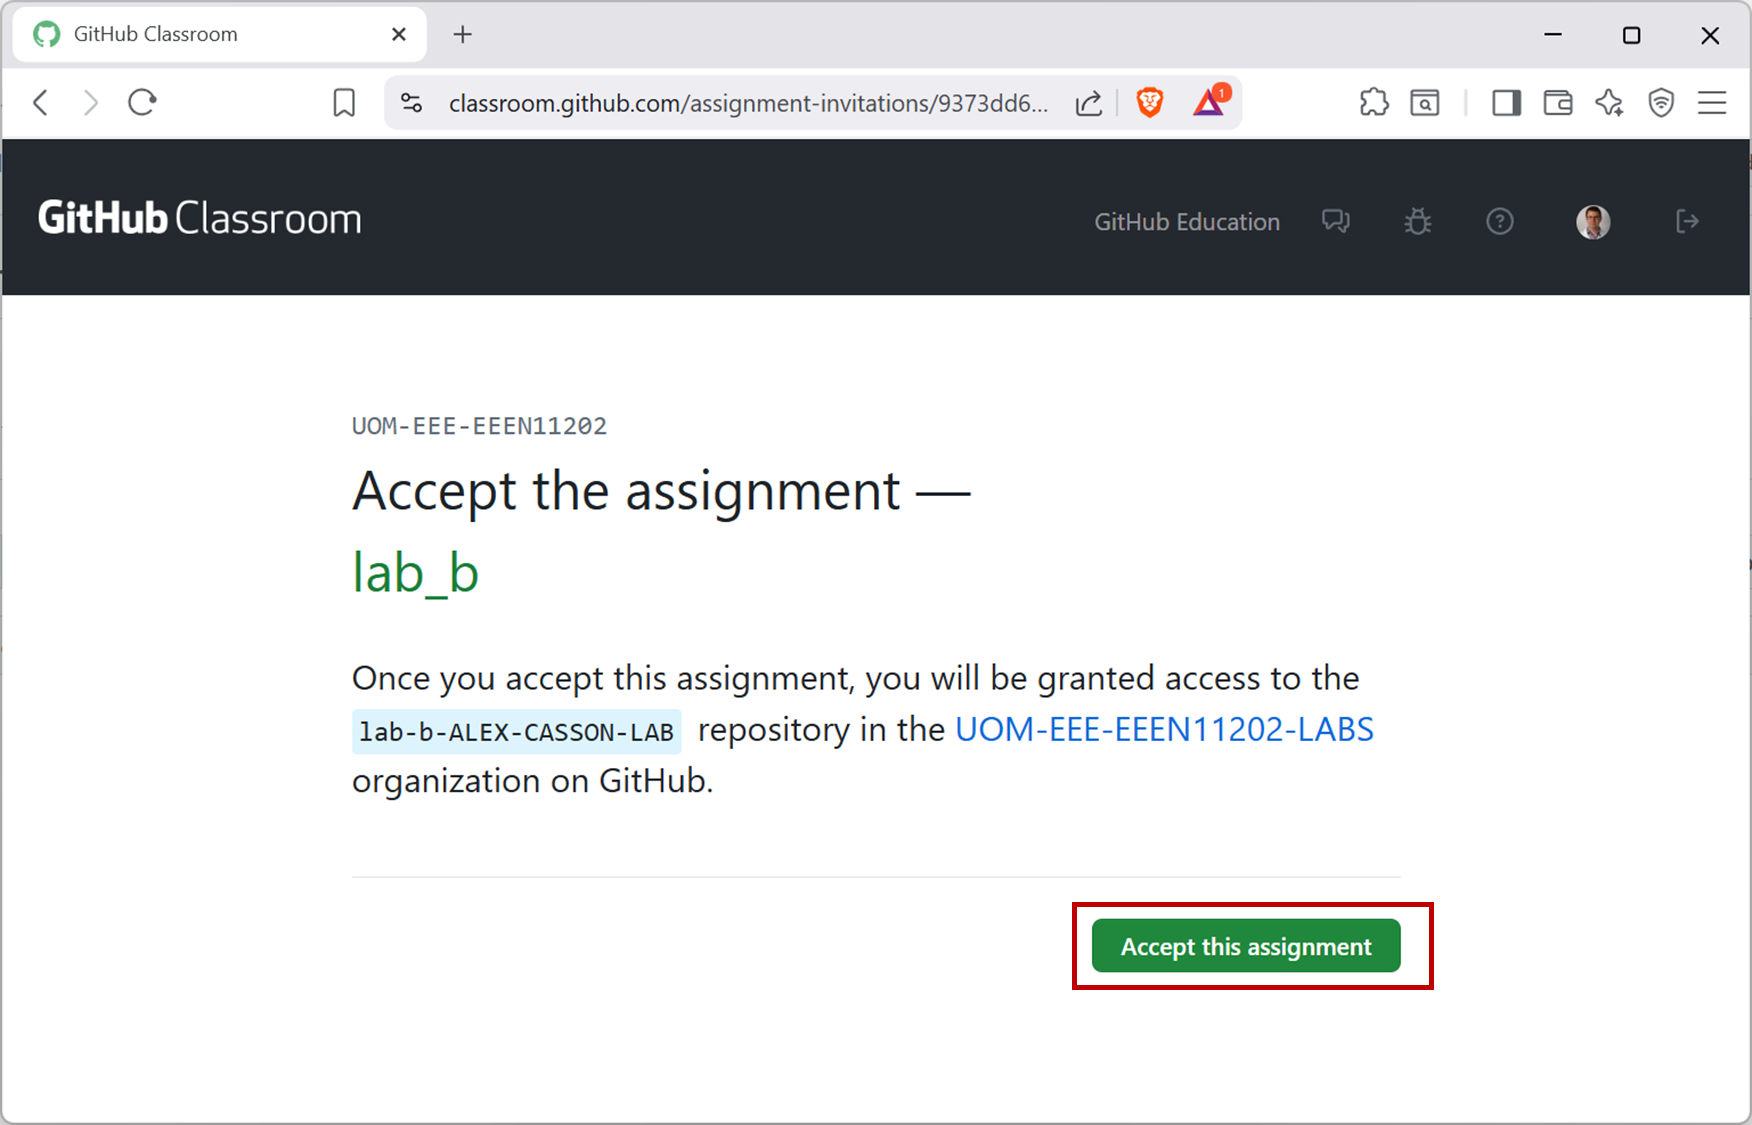
Screenshot of GitHub, software from Microsoft. See course copyright statement.
Once you’ve accepted the assignment, you’ll be taken to a
You're ready to go!page, as shown below.
Screenshot of GitHub, software from Microsoft. See course copyright statement.
This includes a web address. Make a note of this, as you’ll need it later.
The link will be something like https://github.com/UOM-EEE-EEEN11202-LABS/labs-ALEX-CASSON-LAB. Your address will be individual to you, depending on what your GitHub username is.
Now follow the instructions below for your operating system.
Use the start menu to open PowerShell.
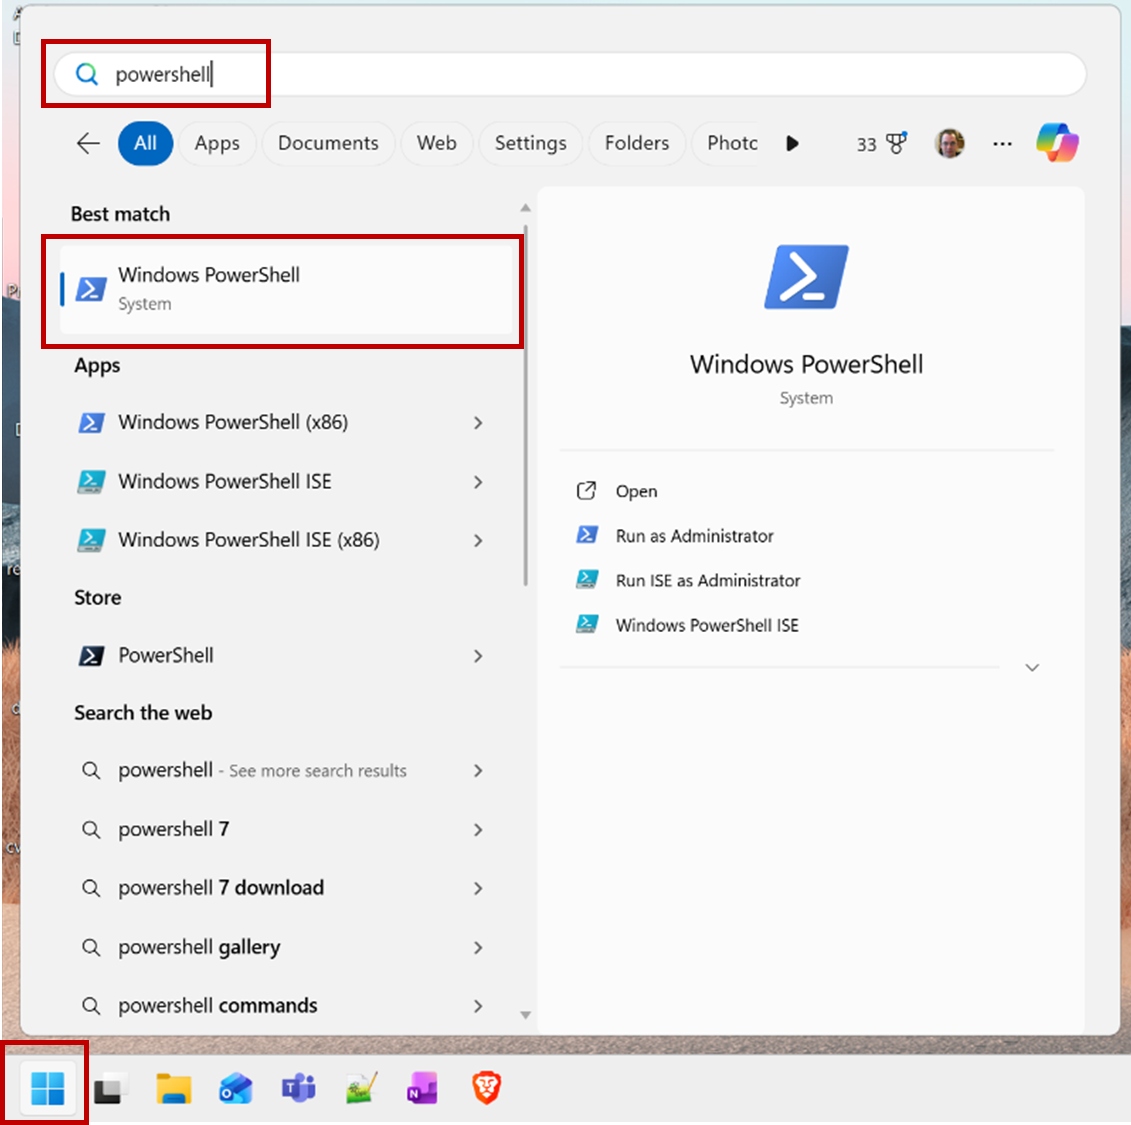
Screenshot of Windows start menu, software from Microsoft. See course copyright statement.
Enter the commands below, one at a time. Remember,
>shows the prompt (i.e. where to enter the commands). It is displayed by PowerShell, you don’t need to enter it yourself. These commands install the software we’ll use.You may be asked to enter some information during the installation, and some graphical items may be displayed. Enter any needed information and press Enter to proceed.
Let each command complete before moving on to the next.
winget install -e --id Microsoft.VisualStudioCode winget install -e --id Docker.DockerDesktop winget install -e --id Git.Git wsl --install
You will be asked to reboot the computer. Do this.
Aside
This uses the Windows Subsystem for Linux (WSL) backend, which is available on Windows Home and Windows Pro. If you are running Windows Pro, you can also use the Hyper-V backend. Both work equally well for this course.
Start Docker using the Start Menu. This will display a set of terms and agreemtns. Read, and then if happy accept the terms and agreements.
You may be asked to sign in to Docker Hub. You can skip this step by clicking
Skip.Enter the commands below, one at a time. These commands download the pre-made files we’ve made for the course, and install an extension in VSCode.
Replace https://github.com/UOM-EEE-EEEN11202-LABS/labs-ALEX-CASSON-LAB with the web address that you noted down above.
Replace
C:\Users\alex\OneDrive - The University of Manchester\eeen11202with the folder where you want to store your code on your computer. We recommend that this is in your University provided OneDrive folder, so that your code is automatically backed up online and available on any University computer where you’re signed in to OneDrive. Make a note of this location, you will need it later.
code --install-extension ms-vscode-remote.remote-containers
$env:MY_GITHUB_ADDRESS = 'https://github.com/UOM-EEE-EEEN11202-LABS/labs-ALEX-CASSON-LAB'
$env:EEEN11202_FOLDER = 'C:\Users\alex\OneDrive - The University of Manchester\eeen11202'
New-Item -ItemType Directory -Path $env:EEEN11202_FOLDER -Force
Set-Location -Path $env:EEEN11202_FOLDER
git clone --recurse-submodules -j8 $env:MY_GITHUB_ADDRESS
Start the
Terminalapplication. You can find this using Spotlight Search (the magnifying glass icon at the top right of your screen).Install
Homebrewby entering the command below. This is a package manager that makes it easy to install software on macOS./bin/bash -c "$(curl -fsSL https://raw.githubusercontent.com/Homebrew/install/HEAD/install.sh)"When the installation completes the terminal will display some instructions. Follow these instructions to complete the installation before moving on to the next step.
Generate a
Personal Access Tokenon GitHub.Go to GitHub. Click on your profile picture in the top right and then
Settings.Click on
Developer settingsin the left hand menu, at the very bottom.Click on
Personal access tokensand thenTokens (classic).Click on
Generate new tokenand thenGenerate new token (classic).Add a name for your token in the
Notebox.Set the expiration to a date after the end of the course.
Tick the
repobox to give the token permissions to access your repositories. This will tick all of the boxes underrepo. You can leave all other categories unticked.Click
Generate tokenat the bottom of the page.This will generate a password, around 40 characters long. You will need this later.
Enter the commands below, one at a time. Remember,
$shows the prompt (i.e. where to enter the commands). It is displayed by the terminal, you don’t need to enter it yourself.You may be asked to enter some information during the installation, and some graphical items may be displayed. Enter any needed information and press Enter to proceed.
Let each command complete before moving on to the next.
Replace https://github.com/UOM-EEE-EEEN11202-LABS/labs-ALEX-CASSON-LAB with the web address that you noted down above.
Replace
/Users/alex/OneDrive - The University of Manchester/eeen11202with the folder where you want to store your code on your computer. We recommend that this is in your University provided OneDrive folder, so that your code is automatically backed up online and available on any University computer where you’re signed in to OneDrive. Make a note of this location, you will need it later.When you run the
git clonecommand, it will ask you for your GitHub username and password. For the username, enter your GitHub username. For the password, enter the Personal Access Token that you generated in the previous step.
GITHUB_ADDRESS="https://github.com/UOM-EEE-EEEN11202-LABS/labs-ALEX-CASSON-LAB" EEEN11202_FOLDER="/Users/alex/OneDrive - The University of Manchester/eeen11202" brew install --cask visual-studio-code code --install-extension ms-vscode-remote.remote-containers brew install --cask docker brew install git mkdir -p $EEEN11202_FOLDER cd $EEEN11202_FOLDER git clone --recurse-submodules -j8 $GITHUB_ADDRESS sed -i '' 's/\/\///' `basename $GITHUB_ADDRESS`/.devcontainer/devcontainer.json
Start Docker. This will display a set of terms and agreemtns. Read, and then if happy accept the terms and agreements.
You may be asked to sign in to Docker Hub. You can skip this step by clicking
Skip.
Start the
Terminalapplication.Enter the commands below, one at a time. Remember,
$shows the prompt (i.e. where to enter the commands). It is displayed by the terminal, you don’t need to enter it yourself.You may be asked to enter some information during the installation, and some graphical items may be displayed. Enter any needed information and press Enter to proceed.
Let each command complete before moving on to the next.
These instructions assume a Debian based Linux distribution such as Ubuntu.
Replace https://github.com/UOM-EEE-EEEN11202-LABS/labs-ALEX-CASSON-LAB with the web address that you noted down above.
Replace
/home/alex/OneDrive - The University of Manchester/eeen11202with the folder where you want to store your code on your computer. We recommend that this is in your University provided OneDrive folder, so that your code is automatically backed up online and available on any University computer where you’re signed in to OneDrive. Make a note of this location, you will need it later.
GITHUB_ADDRESS="https://github.com/UOM-EEE-EEEN11202-LABS/labs-ALEX-CASSON-LAB"
EEEN11202_FOLDER="/home/alex/OneDrive - The University of Manchester/eeen11202"
sudo apt update
sudo apt install software-properties-common apt-transport-https wget
wget -qO- https://packages.microsoft.com/keys/microsoft.asc | gpg --dearmor > packages.microsoft.gpg
sudo install -D -o root -g root -m 644 packages.microsoft.gpg /etc/apt/keyrings/packages.microsoft.gpg
sudo sh -c 'echo "deb [arch=amd64 signed-by=/etc/apt/keyrings/packages.microsoft.gpg] https://packages.microsoft.com/repos/code stable main" > /etc/apt/sources.list.d/vscode.list'
sudo apt update
sudo apt install code
code --install-extension ms-vscode-remote.remote-containers
sudo apt install curl ca-certificates
curl -fsSL https://download.docker.com/linux/ubuntu/gpg | sudo gpg --dearmor -o /usr/share/keyrings/docker-archive-keyring.gpg
echo "deb [arch=$(dpkg --print-architecture) signed-by=/usr/share/keyrings/docker-archive-keyring.gpg] https://download.docker.com/linux/ubuntu $(lsb_release -cs) stable" | sudo tee /etc/apt/sources.list.d/docker.list > /dev/null
sudo apt update
sudo apt install docker-ce -y
sudo usermod -aG docker $USER
newgrp docker
sudo apt-get install git-all
mkdir -p $EEEN11202_FOLDER
cd $EEEN11202_FOLDER
git clone --recurse-submodules -j8 $GITHUB_ADDRESS
3.1.2.1.2. Starting the programming environment the first time
Start Docker using the Start Menu (Windows) or equivalent on your operating system.. You can close the main window, Docker just needs to be running in the background.
Open VSCode from the Start Menu (Windows) or equivalent on your operating system.
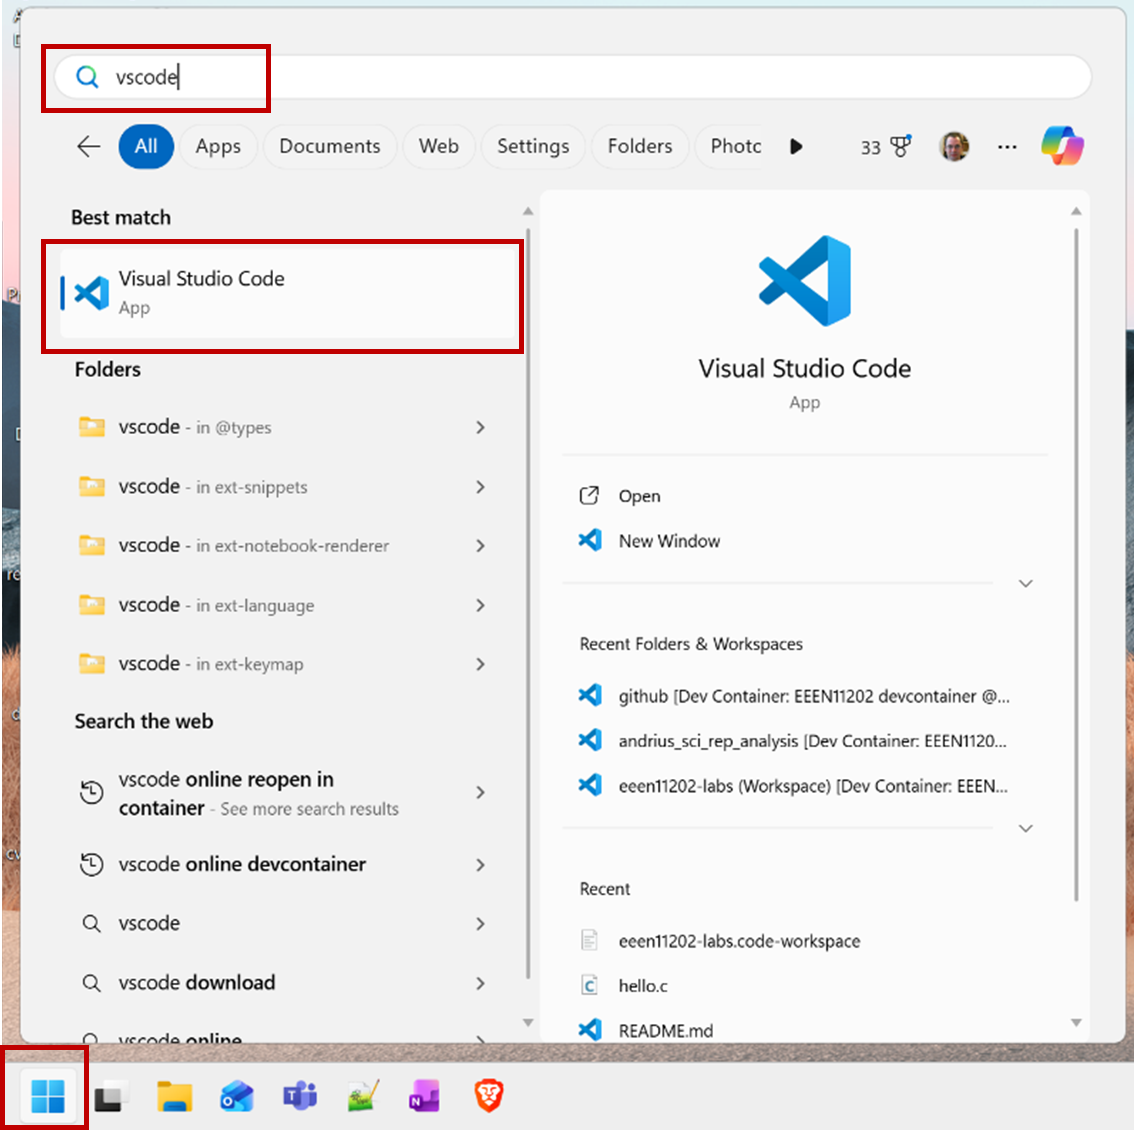
Screenshot of Windows start menu, software from Microsoft. See course copyright statement.
The first time you open VSCode it will let you change some of the default settings. We suggest that you turn on GitHub Copilot, and otherwise choose whichever settings you prefer. You can always change these later.
On the welcome screen, click on
Open folder....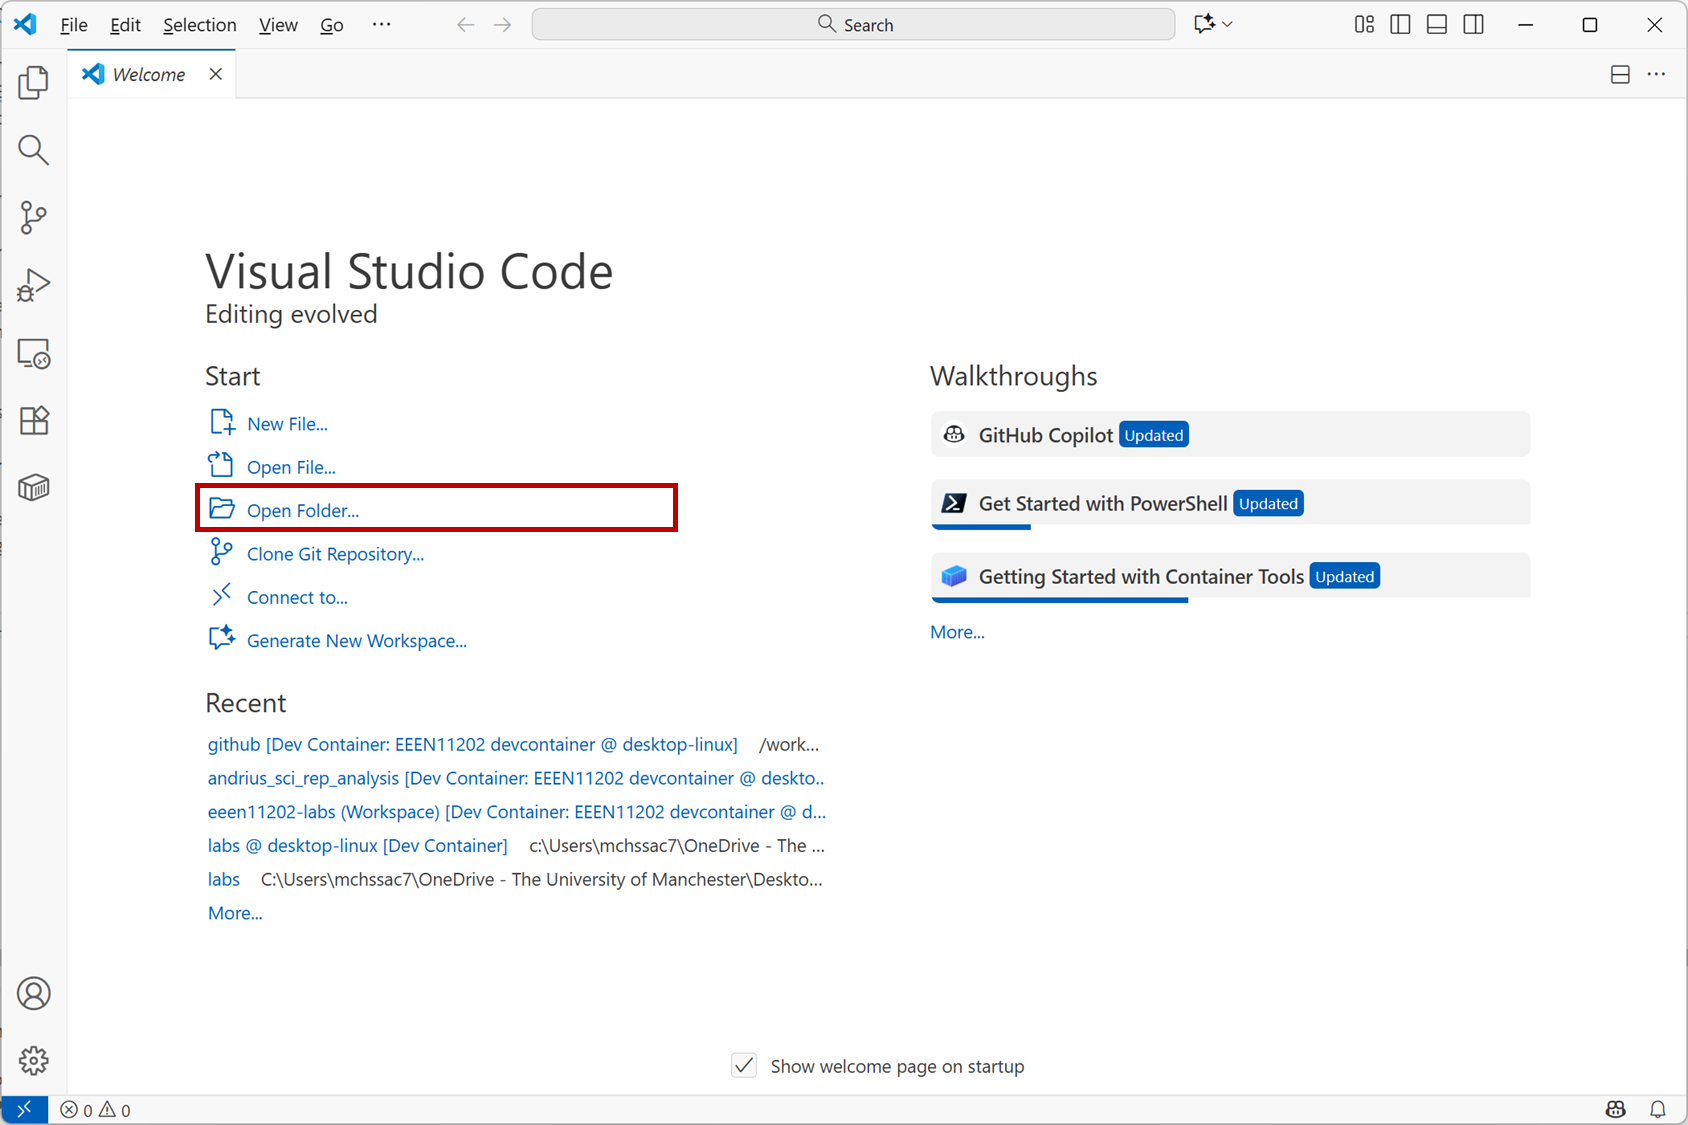
Screenshot of VSCode, software from Microsoft. See course copyright statement.
Navigate to the the folder location you chose above (e.g.
C:\Users\alex\OneDrive - The University of Manchester\eeen11202on Windows). This will contain another folder calledlabs-ALEX-CASSON-LABwhich has been downloaded automatically from GitHub for you (with your GitHub username instead of ALEX-CASSON-LAB). It contains a number of pre-made files and settings that we’ll use in the labs.Select this folder and click
Select Folder.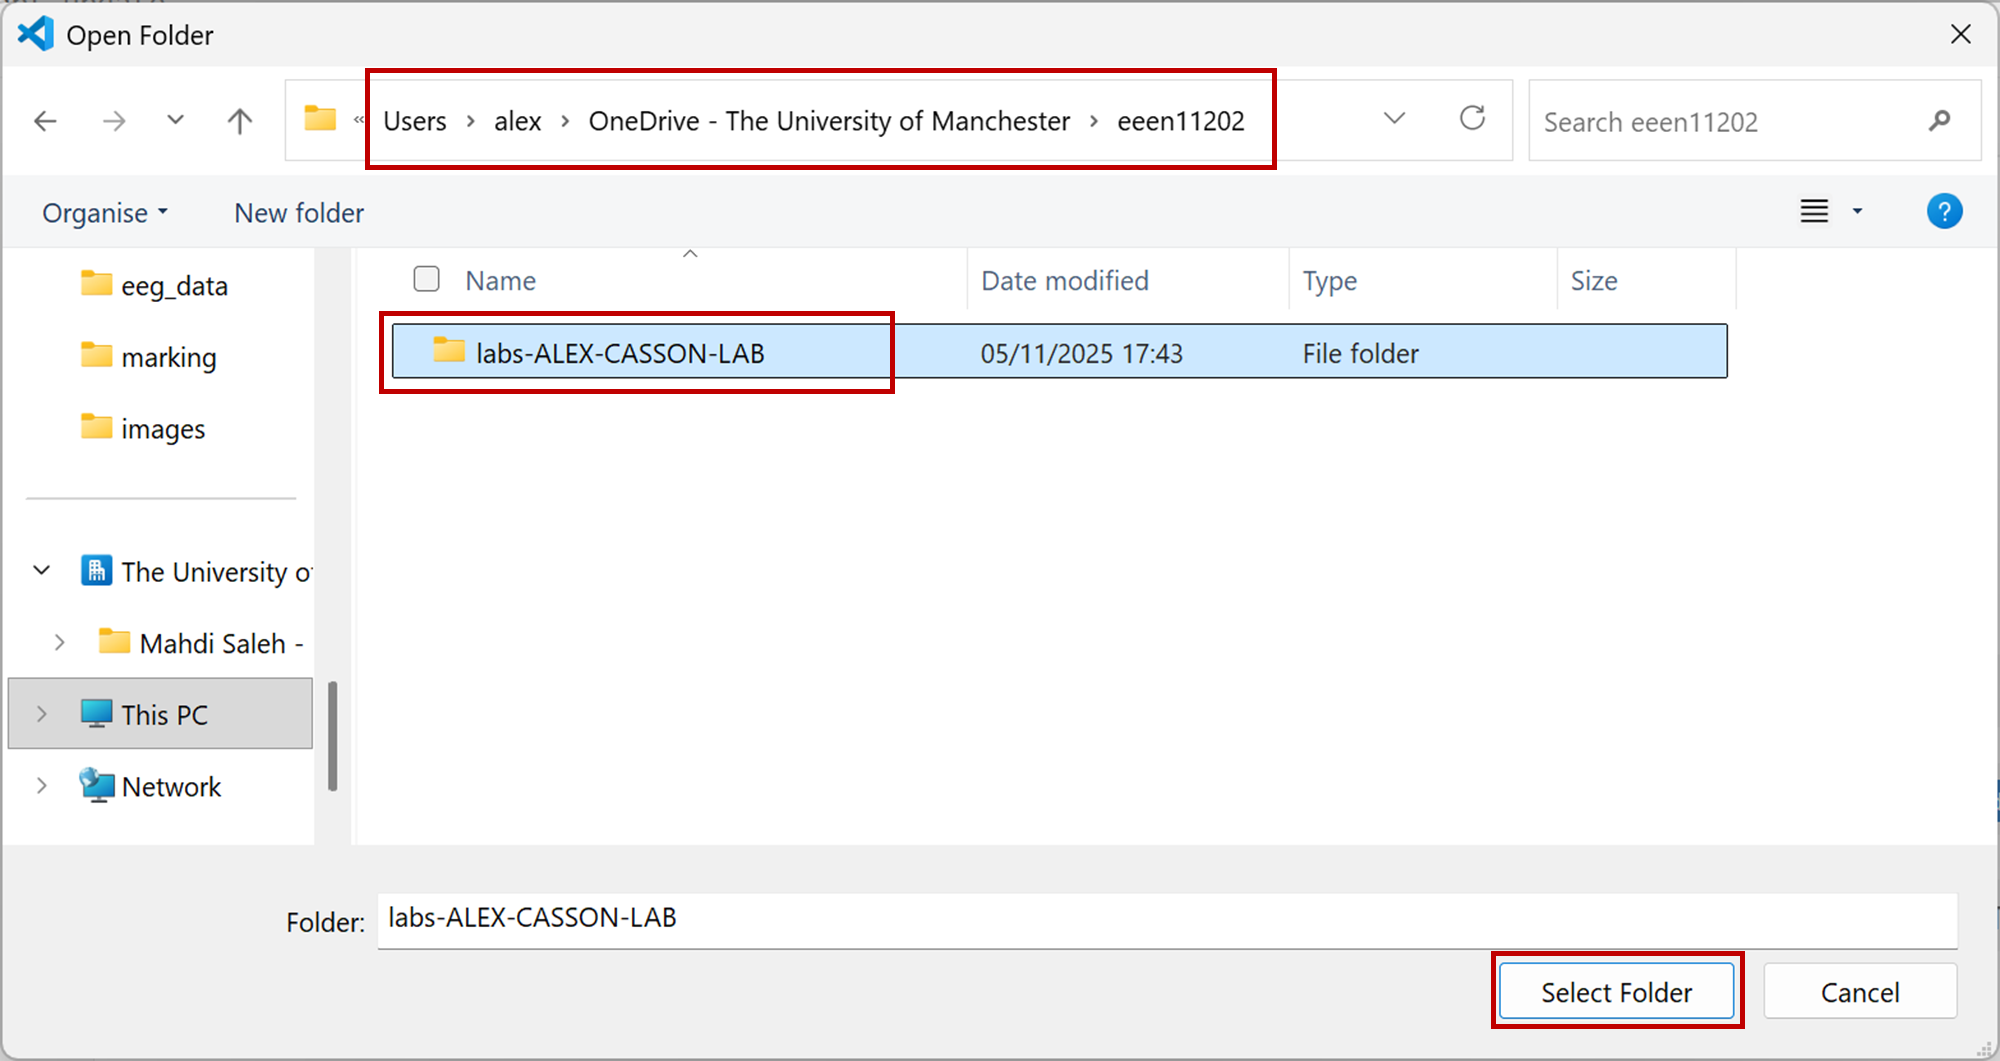
Screenshot of Windows file dialog, software from Microsoft. See course copyright statement.
This will display a
Reopen in Containerprompt. SelectReopen in Container. If the prompt disappears (it is only displayed for a few seconds) you can click on the blue arrows in the bottom left corner to bring up the option again.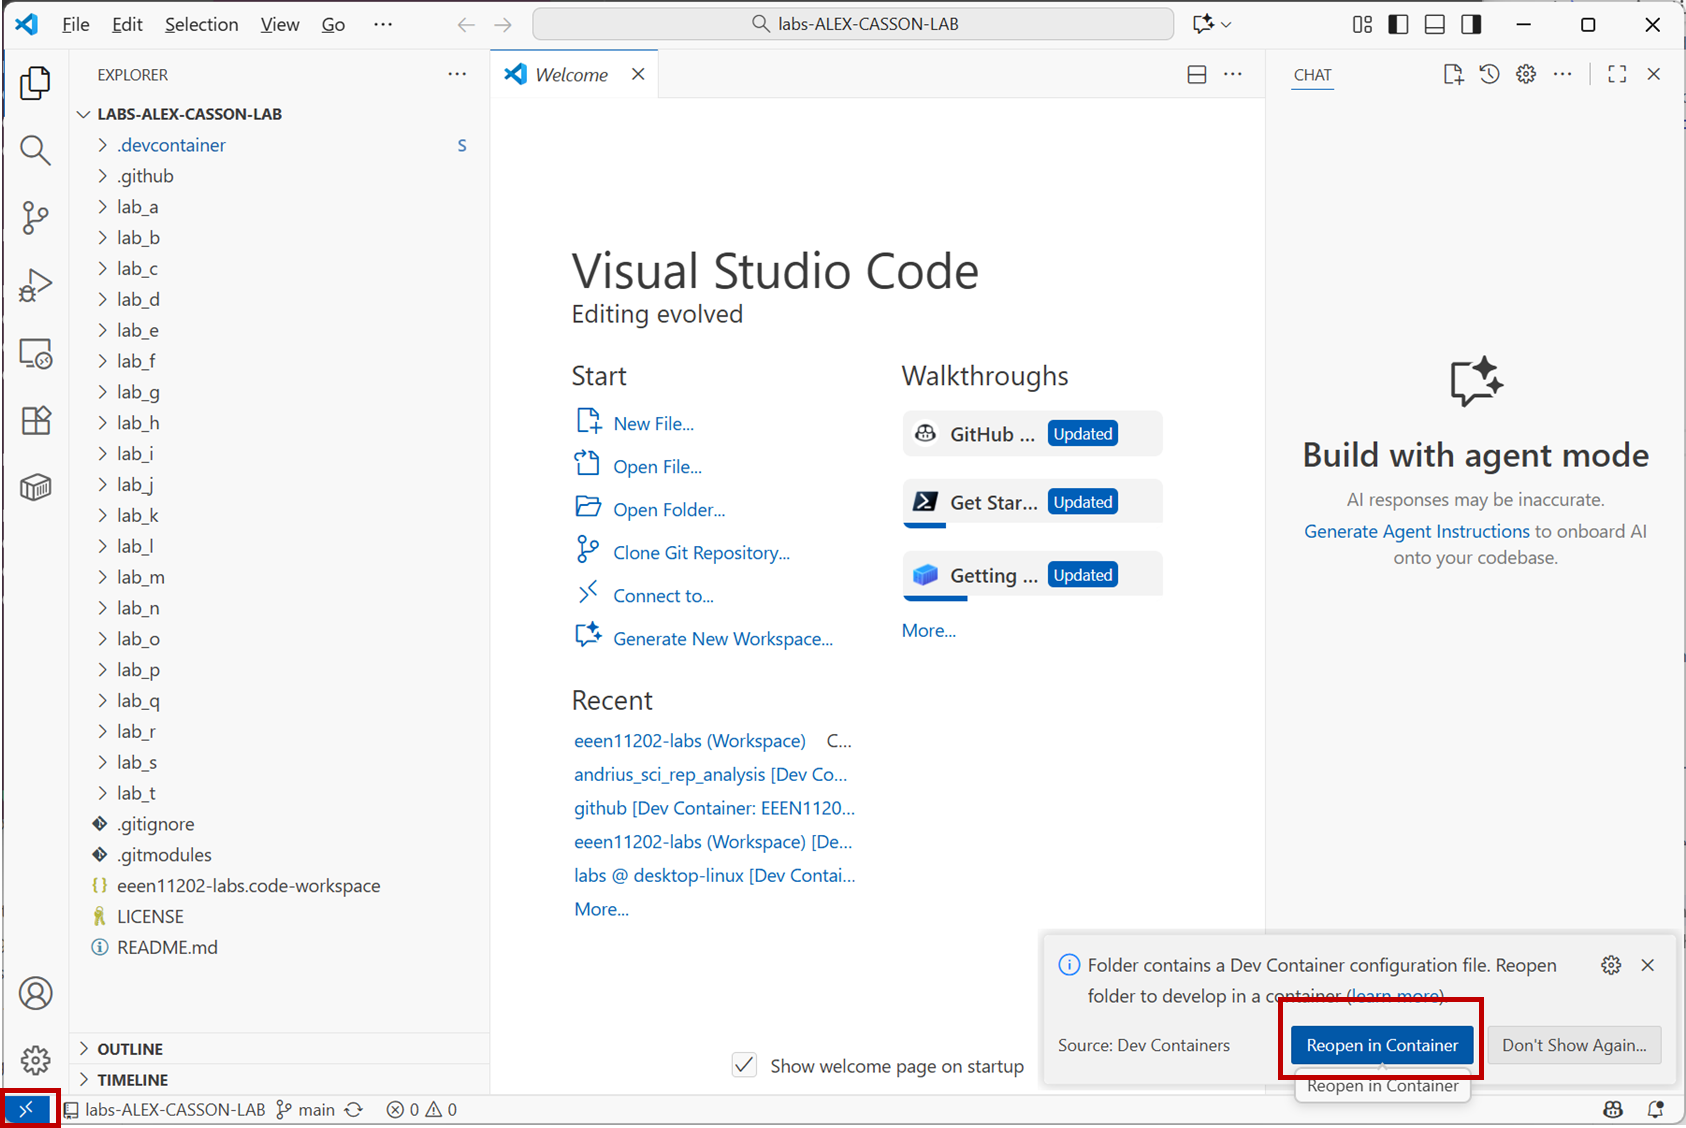
Screenshot of VSCode, software from Microsoft. See course copyright statement.
This will detect that a
workspaceis present. SelectOpen Workspace.
Screenshot of VSCode, software from Microsoft. See course copyright statement.
If the prompt disappears (it is only displayed for a few seconds) you can select
File / Open Workspace from File...and select theeeen11202-labs.code-workspacefile that you’ll find in yourlabs-ALEX-CASSON-LABfolder equivalent.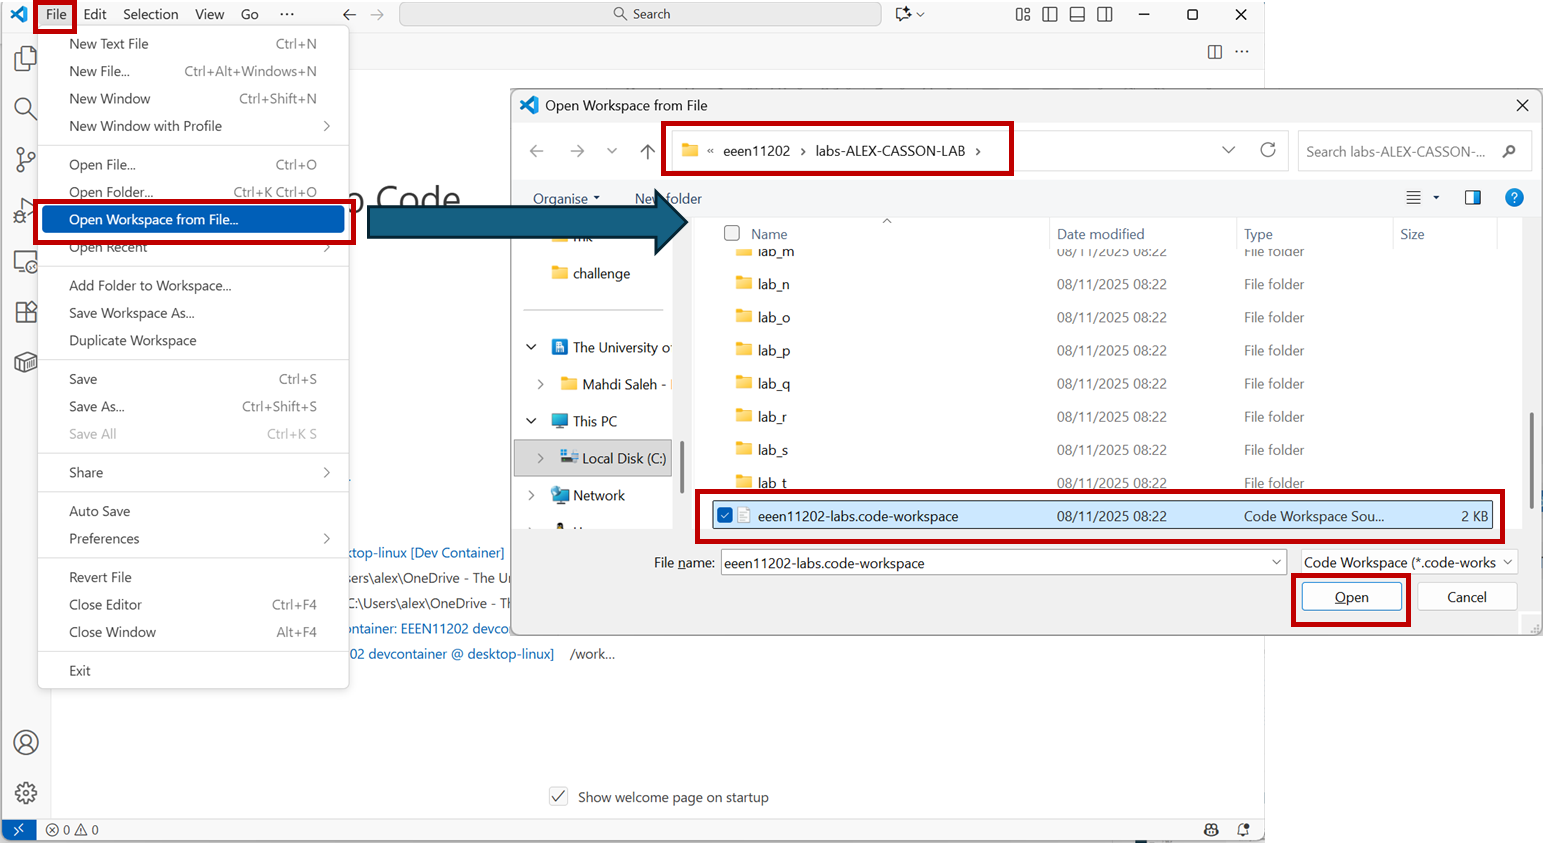
Screenshot of VSCode, software from Microsoft. See course copyright statement.
When done your VSCode will look like the below. Note that in the bottom left hand corner it says it’s connected to a Dev Container. In the explorer, each lab is listed using upper case letters (e.g. Lab A rather than lab-a) and it says workspace at the top. If you don’t have these, you’ve missed a step.
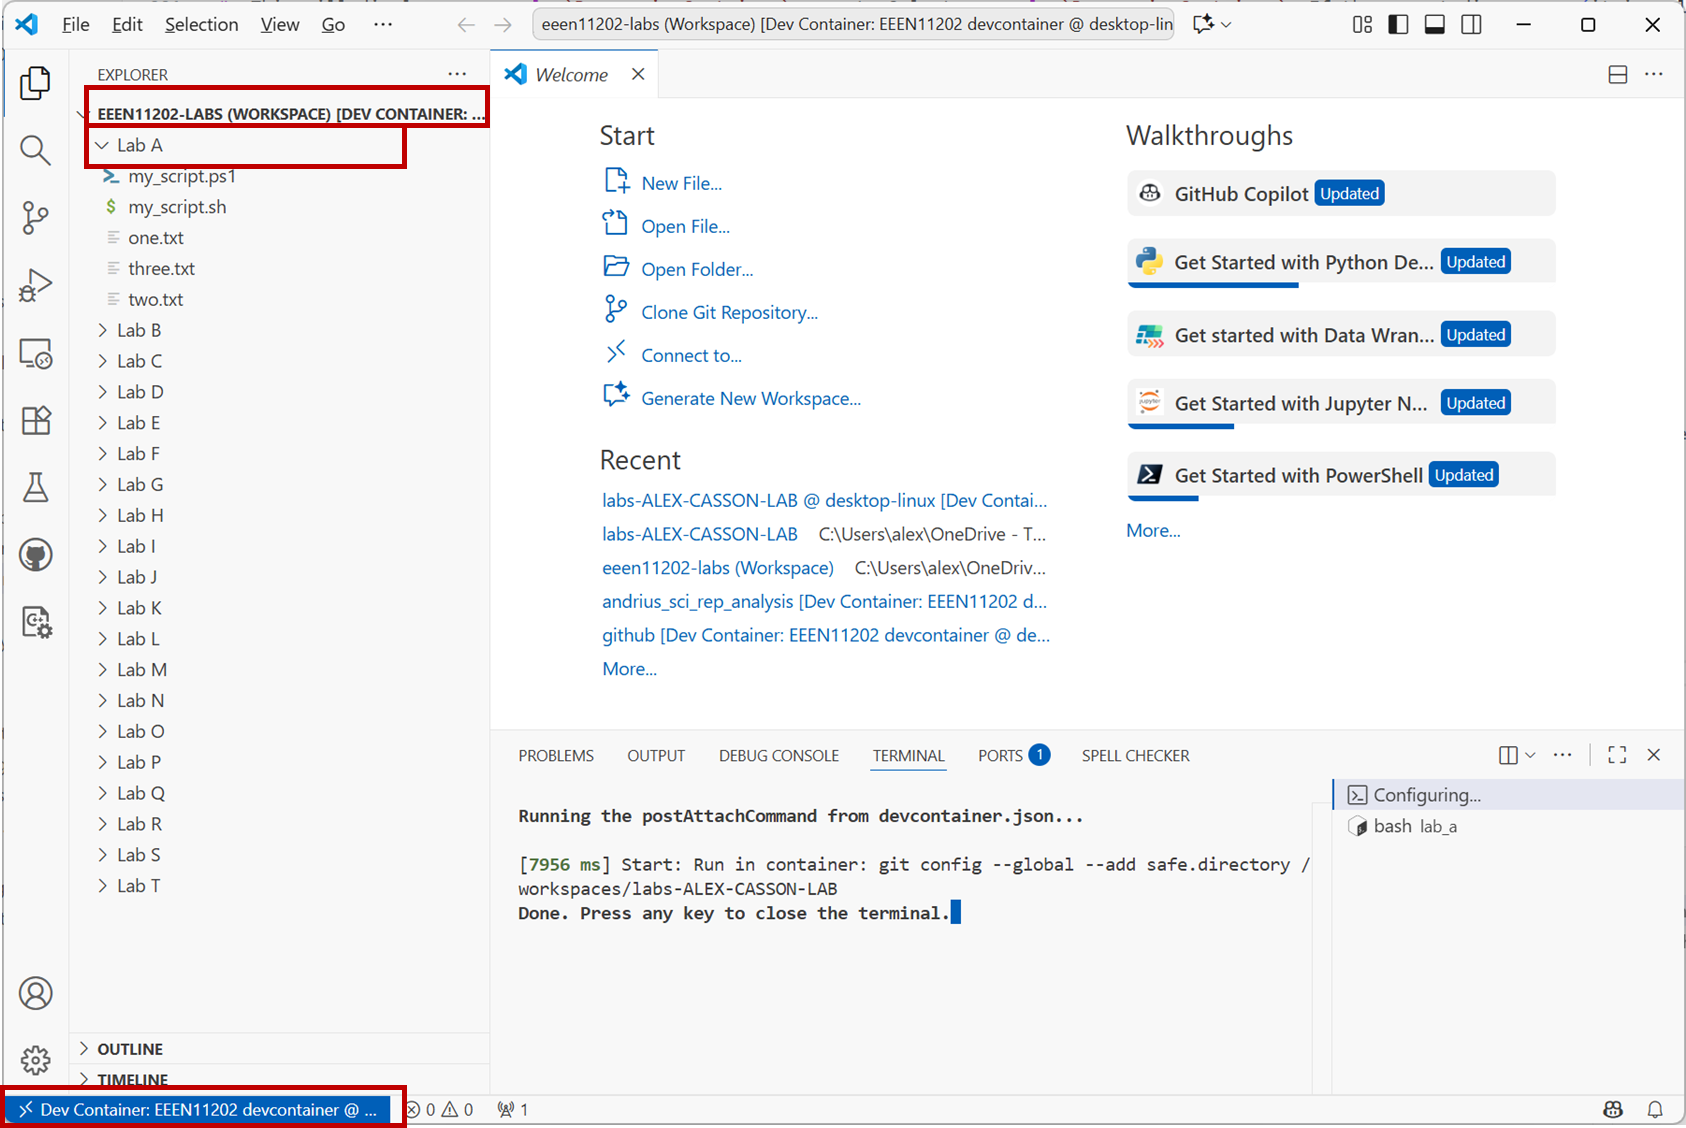
Screenshot of VSCode, software from Microsoft. See course copyright statement.
3.1.2.1.3. Starting the programming environment subsequent times
There are quite a few steps in the above! That is because we’ve opened both a devcontainer and a workspace.
Start Docker using the Start Menu. You can close the main window, Docker just needs to be running in the background.
Once you’ve started VSCode correctly once, it will remember the configuration. On the VSCode welcome page you should see an eeen11202 workspace and devcontainer option in the
Recentlist. You can just select this and it will re-load the setup in a single step.
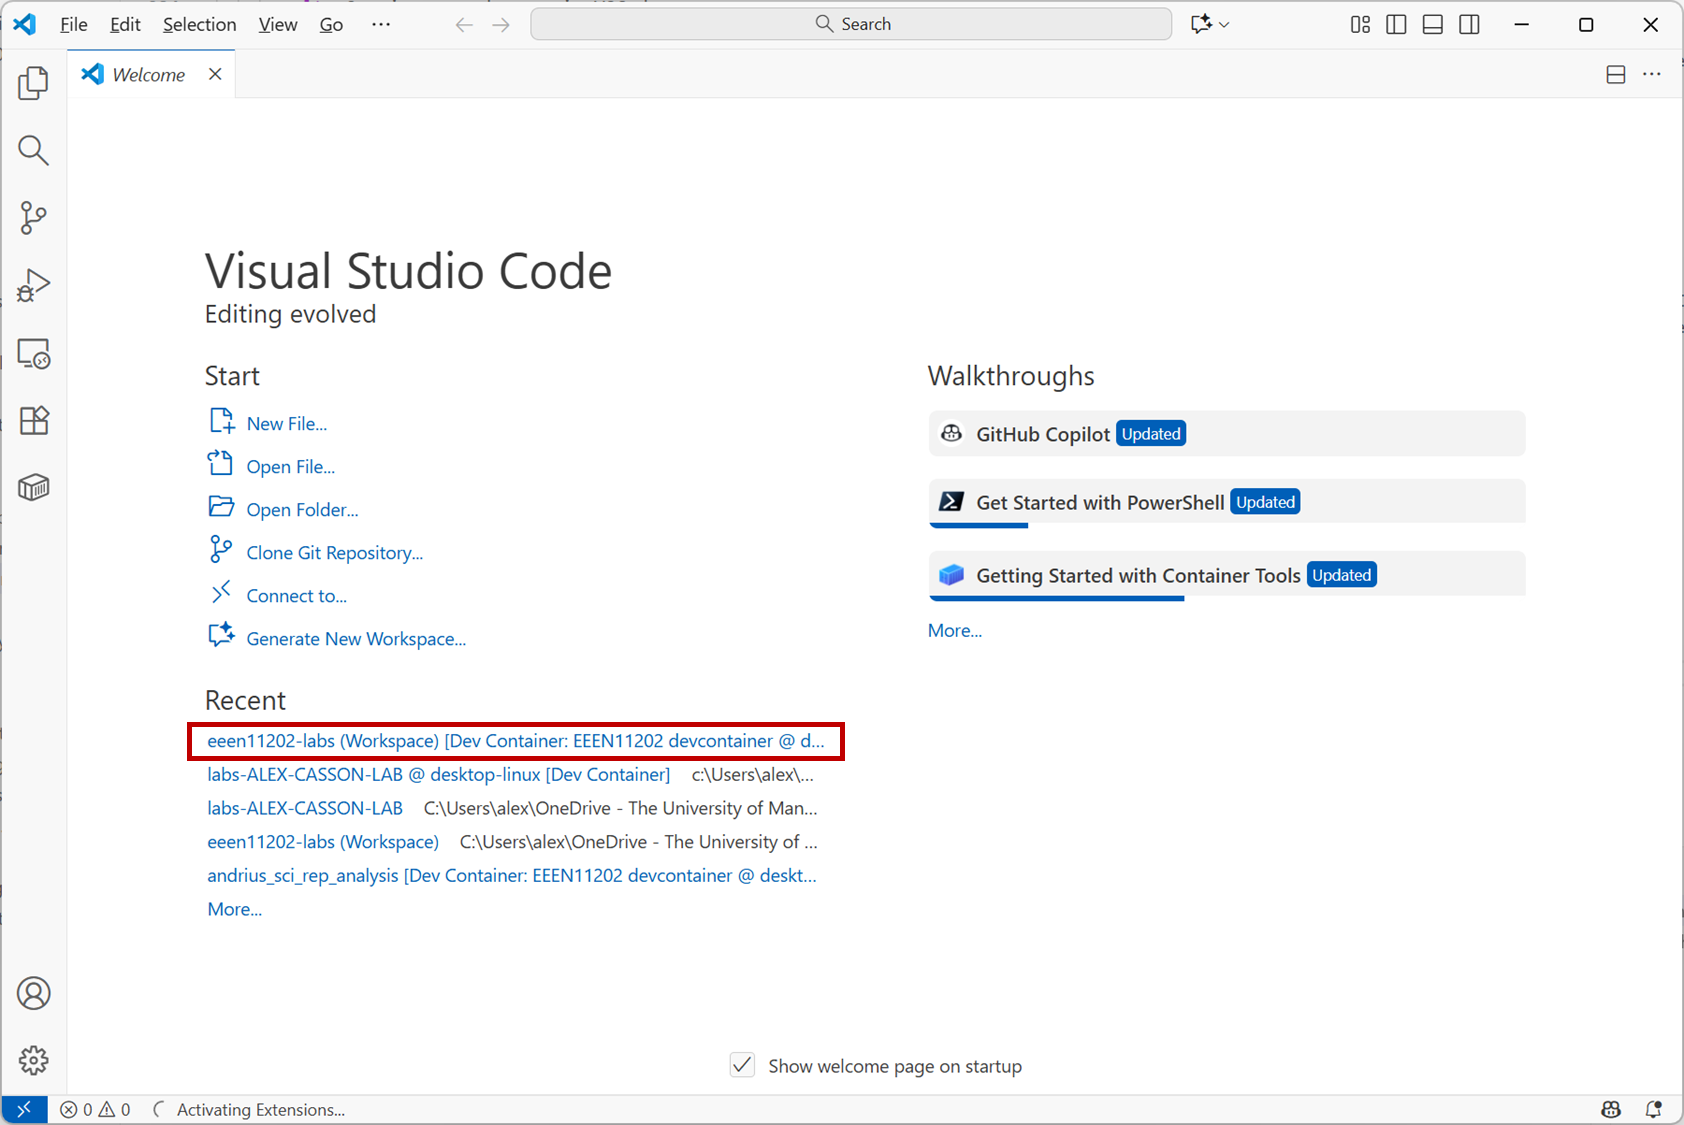
Screenshot of VSCode, software from Microsoft. See course copyright statement.