5.2.1. Objects and classes
5.2.1.1. Initial setup for the Lab
In the VSCode terminal enter:
cd /workspaces/`ls /workspaces` && mkdir -p lab-g cd /workspaces/`ls /workspaces`/lab-g uv init .
Remember to enter these one at a time, not both together.
This will make a new Python project in the current folder. It will be named automatically after the folder name.
To analyze these lines:
cd /workspaces/`ls /workspaces` && mkdir -p lab-gmakes the lab-g folder. There are no pre-downloaded files needed for Lab G. Sometimes this means that the Lab G folder isn’t downloaded automatically (because it’s empty).cd /workspaces/`ls /workspaces`/lab-gmakes sure we are working in the lab-g folder.uv init .is the interesting command. It makes a simple pyproject.toml file to define the project. (The actual virtual environment is made automatically when we run code.)
The above will make the a
pyproject.tomlfile, amain.pyfile, and a number of others.Add some structure to your folder by entering the commands:
mkdir tests docs src
mv main.py src
uv run src/main.py
touch tests/__init__.py
Here we’ve moved
main.pyinto thesrcfolder.We’ve made a
testsfolder for any tests that we might want to write later, and adocsfolder for any documentation. We won’t ask you to put anything into these as part of the lab instructions, but you might want to write some tests for your code to check that it’s working!
Install the required dependencies for this lab by entering the command:
uv add numpyRun
uv run src/main.pyto make sure the virtual environment is built.
When you open a Python file, make sure that the correct Python virtual environment is activated. See the instructions in Lab D if you’re unsure.
5.2.1.2. Custom classes and objects
Make a new Python file, with any suitable name, and copy the code below into it. Then run the code.
class ExampleClass:
    """
    Docstring for ExampleClass
    """

    def __init__(self, value):
        self.value = value


def main():
    # Create instances of ExampleClass
    a = ExampleClass(2)
    b = ExampleClass(3)
    c = ExampleClass(4)

    # Print values
    print(a.value)
    print(b.value)
    print(c.value)


if __name__ == "__main__":
    main()
This has defined a new class called
ExampleClass. To analyze the code:The class is defined using the
classkeyword, followed by the name of the class.The body of the class is indented below this line.
The class has one method,
__init__()which defines what happens when a new instance of the class is created.A method is defined using the
defkeyword, just like a function. We just call it a method because the definition is inside a class.The
__init__method name starts and ends with a double underscore__. This is known as a dunder method. All classes will have a range of built in dunder methods which provide default functionality. We don’t have to use them all, but they are there if we want to.The
def __init__(self, value)method takes two inputs,selfandvalue. A method always takesselfas its first input.selfmeans take the name of the current object. That is, if we havea = ExampleClass(2),selfrepresentsa. When we haveb = ExampleClass(2),selfrepresentsb. The class definition doesn’t know what we’re going to call any particular object that we might make, and so it usesselfinstead.Any inputs after
selfare just whatever we want to provide to get the behaviour that we want. Here we’re just making a class that holds a single value.
Fundamentally that’s it! We now just need to make the class as simple or as complicated as we need it to be for whatever problem we’re trying to solve. We’ll make this example a bit more detailed before moving on to something possibly more realistic.
Add
print(a)
to your
main()function, and run the code again. You’ll see something like the below displayed:<__main__.ExampleClass object at 0x7fc9ca73cc20>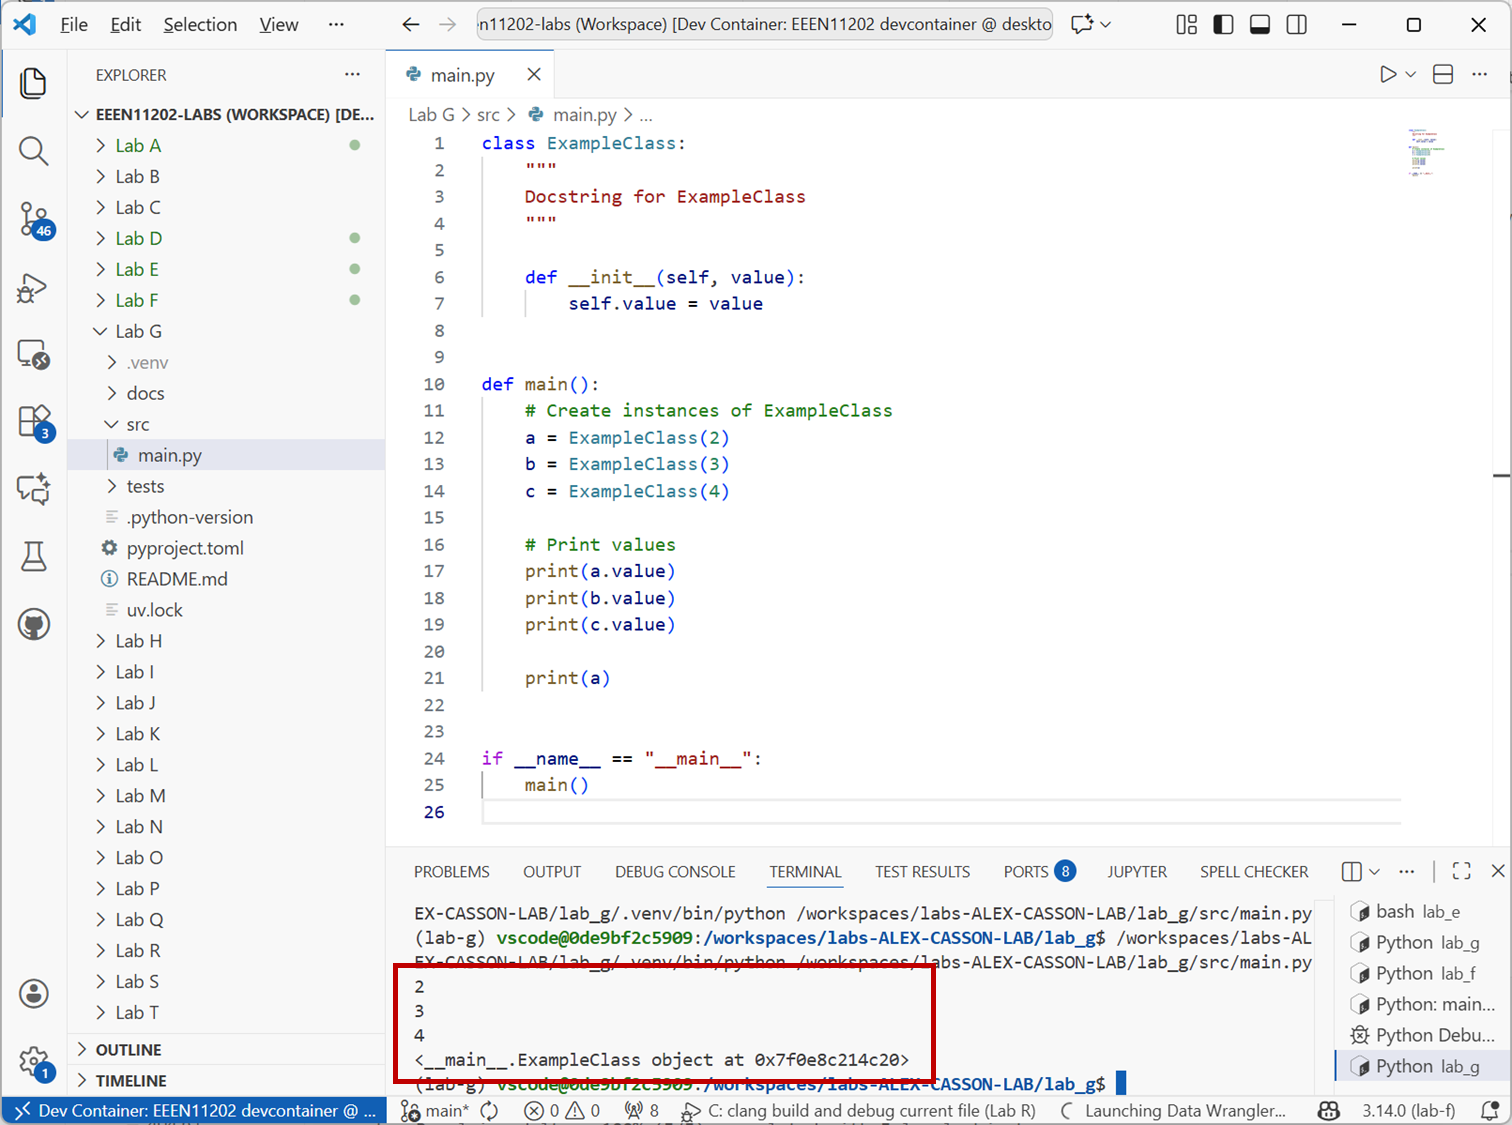
Screenshot of VSCode, software from Microsoft. See course copyright statement.
A method
__str__()in a class defines what happens when we try and print an object of that class. Add the method below to your class definition and run the code again. You should see it displays something more useful now.def __str__(self): return "Hello from ExampleClass"
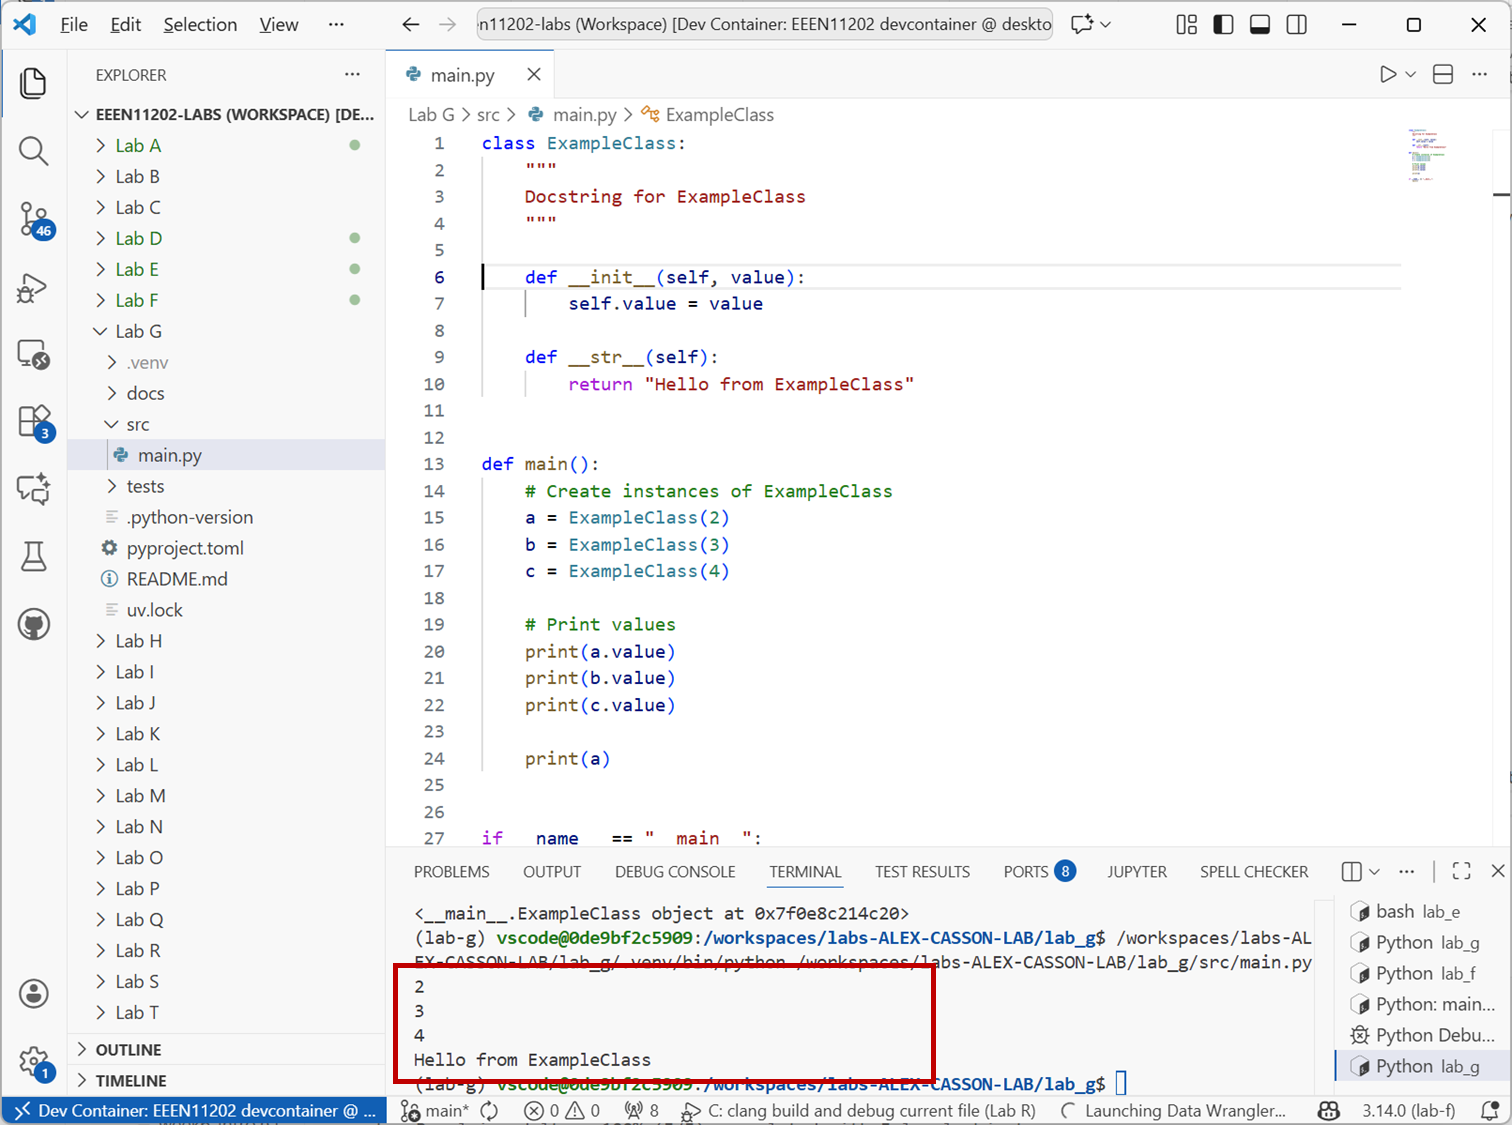
Screenshot of VSCode, software from Microsoft. See course copyright statement.
Modify the
__str__()method to display the value the object is storing.Solution
def __str__(self):
    return f"ExampleClass object with value: {self.value}"
So far we’ve only used some of the built-in dunder methods that Python provides. We can of course add our own methods, in order to add whatever functionality we want.
Add to the class definition the following code:
def multiply(self, factor):
    return self.value * factor
Then in the
main()function, add the code:print(a.multiply(1)) print(b.multiply(2)) print(c.multiply(3))
Your overall code should look like that in the box below. Run the code to see the results.
Solution
class ExampleClass:
    """
    Docstring for ExampleClass
    """

    def __init__(self, value):
        self.value = value

    def __str__(self):
        return f"ExampleClass object with value: {self.value}"

    def multiply(self, factor):
        return self.value * factor


def main():
    # Create instances of ExampleClass
    a = ExampleClass(2)
    b = ExampleClass(3)
    c = ExampleClass(4)

    # Print values
    print(a.value)
    print(b.value)
    print(c.value)

    # Print a
    print(a)

    # Multiply values
    print(a.multiply(1))
    print(b.multiply(2))
    print(c.multiply(3))


if __name__ == "__main__":
    main()
The
multiply()method has its own input, calledfactor. This is just a normal input to a function, except that the first input is alwaysself, which represents the object that the method is being called on. This method multiples the stored value in the object by the inputfactor.Add a new method called
pow()which returns the square of the value stored in the object, if that value is even, and the cube of the value if the value is odd. Test your method by calling it on each of the three objectsa,bandcin themain()function, and printing the results.Solution
class ExampleClass:
    """
    Docstring for ExampleClass
    """

    def __init__(self, value):
        self.value = value

    def __str__(self):
        return f"ExampleClass object with value: {self.value}"

    def multiply(self, factor):
        return self.value * factor

    def pow(self):
        if self.value % 2 == 0:  # determine if value is even
            return self.value**2
        else:
            return self.value**3


def main():
    # Create instances of ExampleClass
    a = ExampleClass(2)
    b = ExampleClass(3)
    c = ExampleClass(4)

    # Print values
    print(a.value)
    print(b.value)
    print(c.value)

    # Print a
    print(a)

    # Multiply values
    print(a.multiply(1))
    print(b.multiply(2))
    print(c.multiply(3))

    # Use pow method
    print(a.pow())
    print(b.pow())
    print(c.pow())


if __name__ == "__main__":
    main()
5.2.1.3. Student marks example
Aside
In the below we’re going to store marks for a student, as we did using Polars dataframes in Lab F. This is just an example to illustrate how to make a class, in an accessible way by using an example you’re already familiar with. In practice, for storing tabular data like student marks using a dataframe might be more appropriate, but it will depend on what you’re trying to do.
Let’s make an object that stores information about a student. Firstly, think about what information we want it to store.
This is a really important question that gets to the heart of why we want to make our own objects. The object is tailored to the problem that we’re trying to solve. We’ll store:
The student’s name
The student’s ID number
The assignment marks (for Labs A to T)
The exam mark
The overall course mark
We could imagine storing attendance information, which degree program the student is on, and other things. We won’t here to keep it compact.
In a new Python file, copy the code below to define a
StudentMarksEEEN11202class. Then run the code.class StudentMarksEEEN11202: """ Docstring for StudentMarksEEEN11202 """ def __init__(self, name, id): self.name = name self.id = id self.assignment_marks = None self.exam_mark = None self.overall_mark = None def main(): # Create instance of StudentMarksEEEN11202 student1 = StudentMarksEEEN11202("Alex", "12345") student2 = StudentMarksEEEN11202("Casson", "67890") # Print contents for student in (student1, student2): print( f"Student Name: {student.name}\n" f"ID: {student.id}\n" f"Assignment marks: {student.assignment_marks}\n" f"Exam mark: {student.exam_mark}\n" f"Overall mark: {student.overall_mark}\n" ) if __name__ == "__main__": main()
This uses a slightly different approach for the
__init__()method. We’ve told it explicitly that when we create a new instance of the class, we need to provide the student’s name and ID number. The other data (assignment marks, exam mark and overall mark) can’t be set when the object is made, they will require methods to set the value. When an object is first made, these values are set to a default value ofNone. (See None in our discussion on datatypes. We’re actually going to change this in the next step.)Note
Note that we’ve used
Nonerather than0as the default mark. UsingNonelets us differentiate between a mark that hasn’t been set yet, and a student who has submitted work but got0for it. In turn, this lets us follow up with students who haven’t submitted yet to make sure they do so before the deadline, and to follow up with students who tried the assignment but got0, to offer them more support. We can’t do these if we just initialize all of the marks to0. Of course, at the end of the course any remainingNonemarks need to be set to0. This use of different data types is part of our data model for this problem.The above isn’t quite a good enough starting point. There are 20 assignments in this course (Assignments A to T) and so we need an array of some form to put these in rather than a single value. We could use a list. We’ll actually use a numpy array, because we’ll want to do some sums on these to get the overall mark.
For a numpy array, rather than
Nonewe use NaN (see NaN in our discussion on datatypes) via np.nan() to represent missing numerical data. This is just the choice we’re making here. You could chose a different data model if you wanted to.Modify the class definition to be:
import numpy as np


class StudentMarksEEEN11202:
    """
    Docstring for StudentMarksEEEN11202
    """

    def __init__(self, name, id):
        no_assignments = 20
        self.name = name
        self.id = id
        self.assignment_marks = np.full((no_assignments,), np.nan)
        self.exam_mark = np.nan
        self.overall_mark = np.nan
np.full((no_assignments,), np.nan)makes an array with 20 elements (no_assignments), each set tonp.nan. The output of the overall code will now look like:Student Name: Alex ID: 12345 Assignment marks: [nan nan nan nan nan nan nan nan nan nan nan nan nan nan nan nan nan nan nan nan] Overall mark: nan Exam mark: nan
Let’s make one more improvement before continuing. Using
np.nanto represent missing data is fine, but it relies on us remembering thatnp.nanmeans “no submission has been made”.We can make the code more readable by making another class,
NoSubmissionto represent no submission. This will just a be wrapper fornp.nan, but it makes the code more readable.Add the following code above the
StudentMarksEEEN11202class definition:class NoSubmission: """ Class to represent no submission made. """ def __init__(self): self.value = np.nan def __str__(self): return "No Submission" def __repr__(self): return "No Submission"
The
__repr__()method is similar to the__str__()method, but is used when the object is displayed in a list or array or similar.StudentMarksEEEN11202can then become:class StudentMarksEEEN11202: """ Docstring for StudentMarksEEEN11202 """ def __init__(self, name, id): no_assignments = 20 self.name = name self.id = id self.assignment_marks = np.full((no_assignments,), NoSubmission()) self.exam_mark = NoSubmission() self.overall_mark = NoSubmission()
Here, it’s a bit clearer that we’re setting the default to represent no submission being made. If you run the code now, the output will look like:
Student Name: Alex
ID: 12345
Assignment marks: [No Submission No Submission No Submission No Submission No Submission No Submission
 No Submission No Submission No Submission No Submission No Submission No Submission
 No Submission No Submission No Submission No Submission No Submission No Submission
 No Submission No Submission]
Overall mark: No Submission
Exam mark: No Submission
which again is a bit clearer.
To complete the class we want to add three methods.
To set the exam mark. Say,
set_exam_mark()To set an assignment mark. Say,
set_assignment_mark()To compute the overall mark. Say,
_set_overall_mark()
We could add more, but this will be sufficient for now. We’ll do the first one in full, and then leave a few steps for you to complete in the other two.
Add another
defblock to theStudentMarksEEEN11202class definition:def set_exam_mark(self, mark): self.exam_mark = mark
This is hopefully fairly clear now. In your
main()function, addstudent1.set_exam_mark(65) student2.set_exam_mark(75)
Check this does what you expect. The current complete code is given below.
Solution
import numpy as np


class NoSubmission:
    """
    Class to represent no submission made.
    """

    def __init__(self):
        self.value = np.nan

    def __str__(self):
        return "No Submission"

    def __repr__(self):
        return "No Submission"


class StudentMarksEEEN11202:
    """
    Docstring for StudentMarksEEEN11202
    """

    def __init__(self, name, id):
        no_assignments = 20
        self.name = name
        self.id = id
        self.assignment_marks = np.full((no_assignments,), NoSubmission())
        self.exam_mark = NoSubmission()
        self.overall_mark = NoSubmission()

    def set_exam_mark(self, mark):
        self.exam_mark = mark


def main():
    # Create instance of StudentMarksEEEN11202
    student1 = StudentMarksEEEN11202("Alex", "12345")
    student2 = StudentMarksEEEN11202("Casson", "67890")

    # Set exam marks
    student1.set_exam_mark(65)
    student2.set_exam_mark(75)

    # Print contents
    for student in (student1, student2):
        print(
            f"Student Name: {student.name}\n"
            f"ID: {student.id}\n"
            f"Assignment marks: {student.assignment_marks}\n"
            f"Exam mark: {student.exam_mark}\n"
            f"Overall mark: {student.overall_mark}\n"
        )


if __name__ == "__main__":
    main()
Setting an assignment mark is a little more complicated because we need to provide both a mark, and which assignment to set the mark for.
We want to call the method like:
student1.set_assignment_mark("a", 2)
student1.set_assignment_mark("b", 5)
Make a new method in the
StudentMarksEEEN11202class calledset_assignment_mark()which takes two inputs, the assignment letter (a string) and the mark (a number), and sets the appropriate element in theassignment_marksarray to the provided mark.You will need to convert the letter to an index in the
self.assignment_marksarray. That is, so that"a"corresponds to index0,"b"to index1and so on. You can use theord()function to get the position of a letter in the alphabet.Solution
def set_assignment_mark(self, assignment_letter, mark):
   index = ord(assignment_letter) - ord("a")  # adjust for 0-based indexing
   self.assignment_marks[index] = mark
Make your method case insensitive, so it can be called as either
student1.set_assignment_mark("a", 2)
student1.set_assignment_mark("A", 2)
Solution
def set_assignment_mark(self, assignment_letter, mark):
   index = ord(assignment_letter.lower()) - ord("a")  # adjust for 0-based indexing
   self.assignment_marks[index] = mark
The final method,
_set_overall_mark()is slightly complicated for two reasons.We don’t want the main code to call this as
student1._set_overall_mark(65)or similar. That’s not how the overall mark works. The overall mark is a result of the combined assessment and exam marks, not something that can be set directly. Instead,._set_overall_mark()should be called automatically whenever an assignment or exam mark is updated. Thus, it’s the class itself that calls._set_overall_mark(). This is known as a private method. By convention, private methods start with an underscore_to indicate that they shouldn’t be called directly from outside the class. Also as a result, implementing._set_overall_mark()requires updatingset_assignment_mark()andset_exam_mark()to call it whenever a mark is updated.We’ve stored not-submitted results as a class
NotSubmitted. We need to decide what to do with these when calculating the overall mark. We will assume that any not-submitted assignments are worth0when calculating the overall mark. This lets a running total mark be calculated as assignments are submitted.
Implement the
_set_overall_mark()method, and update the code to call it and check it works. The overall unit mark is made up 50% from the summed assignment marks, and 50% from the exam mark.Solution
import numpy as np


class NoSubmission:
    """
    Class to represent no submission made.
    """

    def __init__(self):
        self.value = np.nan

    def __str__(self):
        return "No Submission"

    def __repr__(self):
        return "No Submission"


class StudentMarksEEEN11202:
    """
    Docstring for StudentMarksEEEN11202
    """

    def __init__(self, name, id):
        no_assignments = 20
        self.name = name
        self.id = id
        self.assignment_marks = np.full((no_assignments,), NoSubmission())
        self.exam_mark = NoSubmission()
        self.overall_mark = NoSubmission()

    def set_exam_mark(self, mark):
        self.exam_mark = mark
        self._set_overall_mark()

    def set_assignment_mark(self, assignment_letter, mark):
        index = ord(assignment_letter.lower()) - ord("a")  # adjust for 0-based indexing
        self.assignment_marks[index] = mark
        self._set_overall_mark()

    def _set_overall_mark(self):
        assignment_weight = 0.5
        exam_weight = 0.5

        # Set exam to zero if no submission
        tmp_exam_mark = self.exam_mark
        if isinstance(tmp_exam_mark, NoSubmission):
            tmp_exam_mark = 0

        # Set assignments to zero if no submission, and sum
        tmp_assignment_mark = 0
        for assignment_mark in self.assignment_marks:
            if isinstance(assignment_mark, NoSubmission):
                tmp_assignment_mark += 0
            else:
                tmp_assignment_mark += assignment_mark

        # Calculate overall mark
        self.overall_mark = (
            assignment_weight * tmp_assignment_mark + exam_weight * tmp_exam_mark
        )


def main():
    # Create instance of StudentMarksEEEN11202
    student1 = StudentMarksEEEN11202("Alex", "12345")
    student2 = StudentMarksEEEN11202("Casson", "67890")

    # Set assignment marks for student1
    student1.set_assignment_mark("A", 2)
    student1.set_assignment_mark("b", 5)

    # Set exam marks
    student1.set_exam_mark(65)
    student2.set_exam_mark(75)

    # Print contents
    for student in (student1, student2):
        print(
            f"Student Name: {student.name}\n"
            f"ID: {student.id}\n"
            f"Assignment marks: {student.assignment_marks}\n"
            f"Exam mark: {student.exam_mark}\n"
            f"Overall mark: {student.overall_mark}\n"
        )


if __name__ == "__main__":
    main()