2.2.2. Version control
In this second part of the lab we’re going to look at version control. We’ll use this a lot as we move through the course, and will look at more features in later labs.
2.2.2.1. Setting up git
Before we get going with Git, there are a couple of settings that are needed. These aren’t automatically set when you install Git. You only need to do this once.
At the VSCode terminal enter the two commands:
git config --global user.name "Your Name"
git config --global user.email "your.email@student.manchester.ac.uk"
where you replace these with your details.
If you miss this step, you’ll find you get errors later on in the lab.
2.2.2.2. Checking in files
In the first part of this lab you made a new file, called either hello_world.ps1 or hello_world.sh. Let’s add this to the version control system so that we have a record of it, and can track any changes we make to it in future.
Previously quite a few of our steps varied depending on which operating system you were using. That’s not the case now. We’re now using consistent tools across all operating systems, so the steps are the same regardless of whether you’re using Windows, macOS, or Linux as your main host operating system (although your filename may differ between hello_world.ps1 or hello_world.sh).
You do have a choice for whether you use the VSCode graphical interface, or the command line interface.
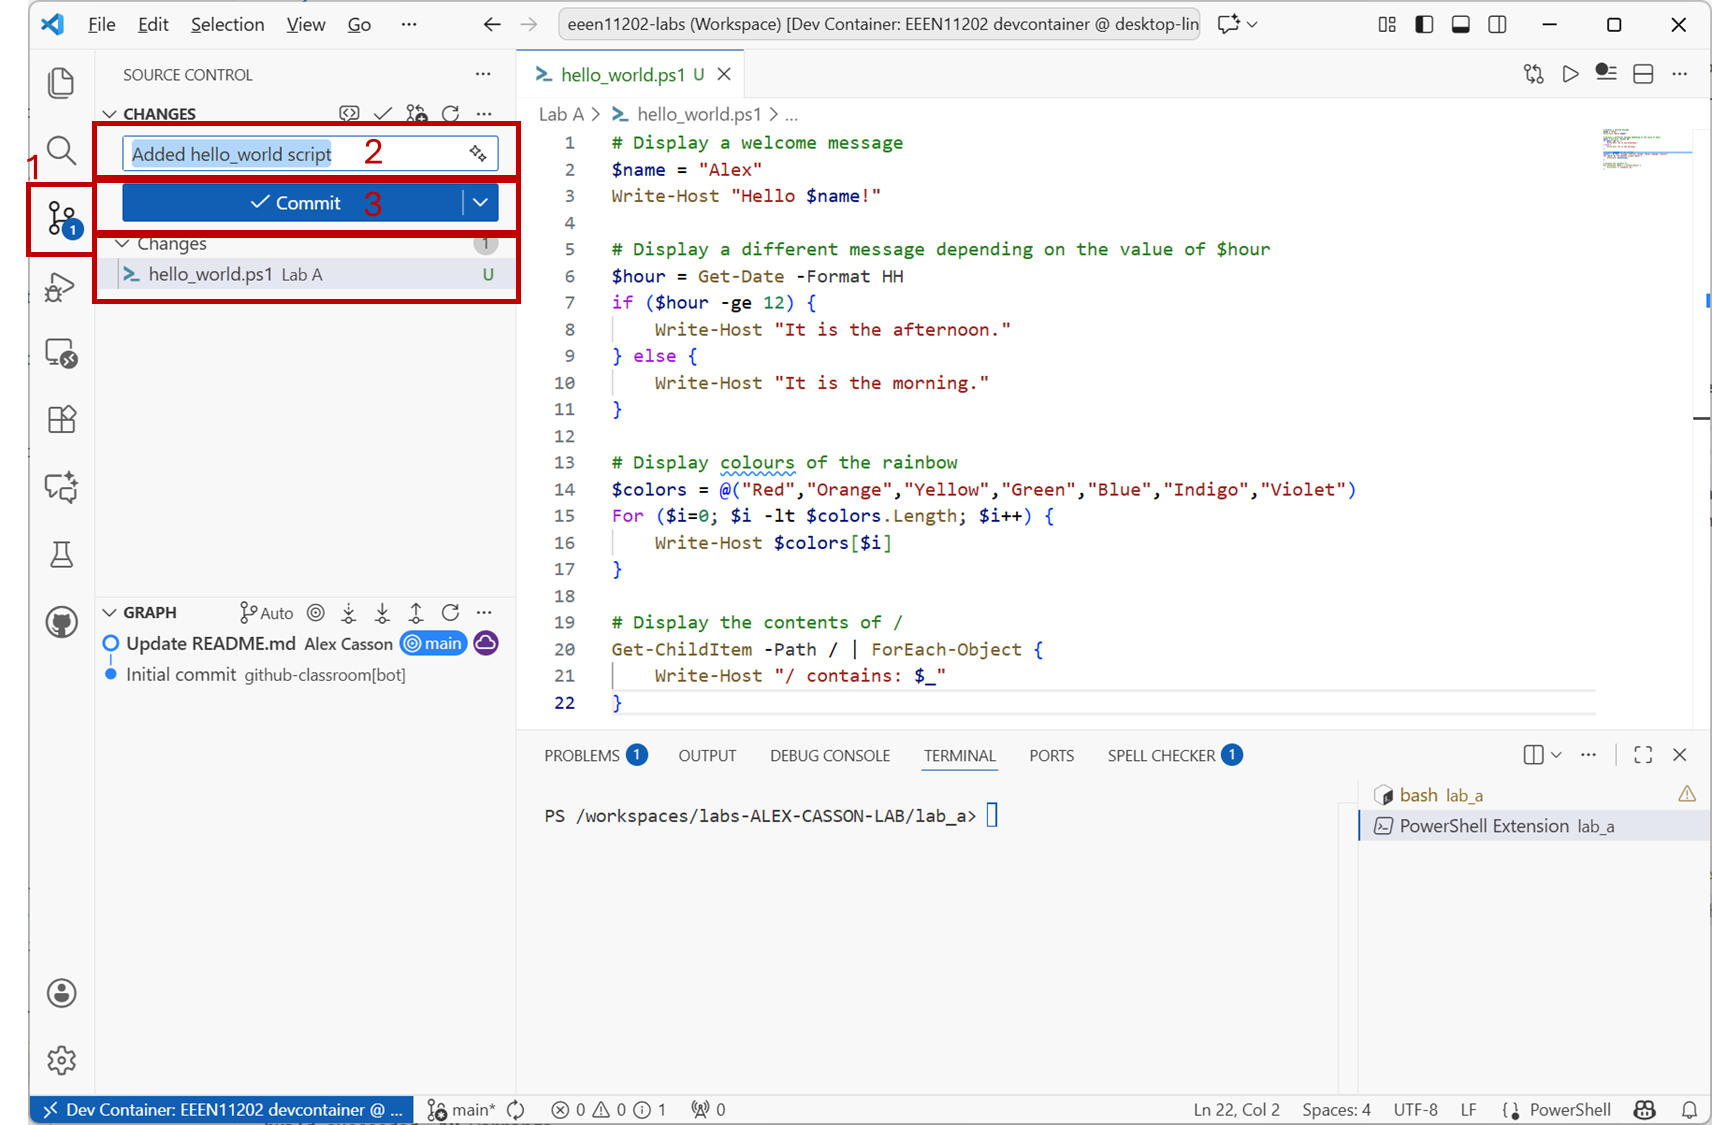
Click on the Source Control tab in the left hand menu. This will have automatically detected that you have a new file. It will have a U next to it. This indicates that the file is untracked. That is, we’ve not checked it in to the version control system yet. (See the figure below.)
To do this, add a comment such as “Added hello_world script” in the box that’s present. Git forces you to add some documentation, explaining the changes that you’ve made. You should add something brief but meaningful, to help to tell what you added, changed, or removed in different versions of the code.” Then press Commit.
Screenshot of VSCode, software from Microsoft. See course copyright statement.
This adds the file to be tracked for any changes, and commits it to the local repository. You may like to re-read the section on version control to remind yourself on these terms.
You’ll see that the Commit button has changed to Sync Changes. Press this.

Screenshot of VSCode, software from Microsoft. See course copyright statement.
You may be asked to to press OK.
Enter the command
git status
This will produce some output similar to
On branch main
Your branch is up to date with 'origin/main'.

Untracked files:
  (use "git add <file>..." to include in what will be committed)
        hello_world.ps1

nothing added to commit but untracked files present (use "git add" to track)
This is saying that the file hello_world.ps1 is not currently being tracked by the version control system.
Enter the commands
git add hello_world.ps1
git commit -m "Added hello_world script"
This adds the file to be tracked for any changes, and commits it to the local repository. You may like to re-read the section on version control to remind yourself on these terms.
There are two important notes on the commands above.
Git doesn’t look for changes in all of our files by default. It lets you have files in the same folder, some of which it does track, and some of which it doesn’t. That’s why we have to explicitly add our new file. If you have lots of files, you can use
git commit -a -m "Added hello_world script"to add all new files to be tracked without having to add them one by one.
The
-mstands for message. Git forces you to add some documentation, explaining the changes that you’ve made. You should add something brief but meaningful, to help to tell what you added, changed, or removed in different versions of the code.
Finally, enter the commands
git fetch
git push
This updates the remote repository with the changes you’ve made locally. You should be able to go to the GitHub website and see that your new file is there. This step in fact does two things:
It checks for any updates in the remote repository and downloads them.
It pushes your updates to to the remote repository.
This helps keep your files in sync with any changes that have been made. It’s best practice to make sure your code is up to date with any changes in the remote repository (e.g. code updated made by others) before pushing your own updates.
Remember, having both local and remote repositories is a key part of version control. Essentially, one is for your local work, one is for putting in a shared location for team members all working on the same code. In the context of this course, the team is you the student, and us, the online marking system in Gradescope. To submit your code to us, you have to push it to your remote repository, and you can only do this after committing it to your local repository.
2.2.2.3. Modifying our shell scripts
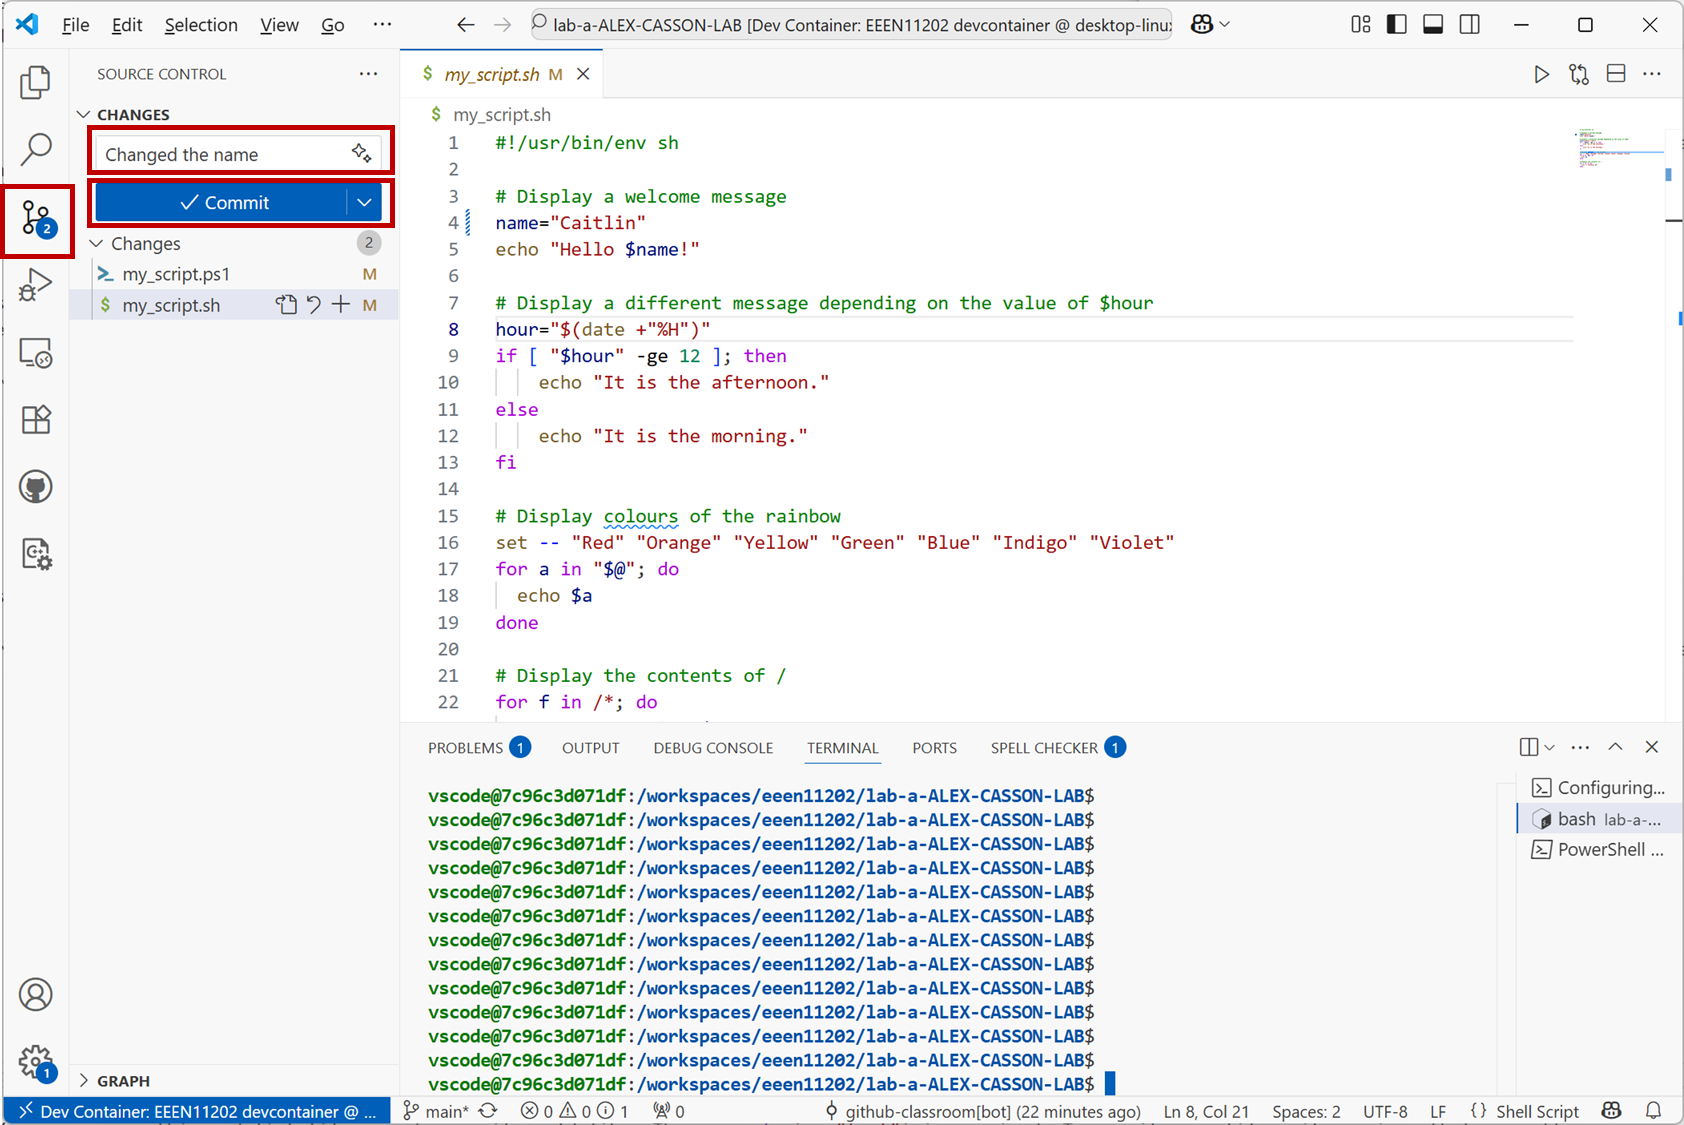
Now let’s looking at modifying our code. Open one of the script files to edit. This can be your hello_world file you made, or the my_script file we provided to you. It doesn’t make a difference to the steps. The screenshots below use my_script.sh.
In your script, change the name. In the screenshots below the name has been changed from Alex to Caitlin.
When you save your changes, you’ll see that VSCode has detected that the file has been modified.
VSCode has added M in a number of places. This indicates the file has been modified, with changes not yet committed to the local repository.
Screenshot of VSCode, software from Microsoft. See course copyright statement.
Enter the command
git status
You need to explicitly commit or check in the changes to the version control system. It won’t keep a copy of every change you make, only the ones you ask it to. Again you can do this in the GUI or at the command line, you only need to do one.
See the screenshot above.
Enter a message in the Message box to give some brief documentation on what’s changed. To commit the changes you need to click the Commit button.
Enter
$ git commit -a -m "Changed the name"
As before, committing the changes only updates the local repository. You also need to explicitly update the remote repository. This is very common industry practice - you work on a local copy of the code, and can make as many version controlled changes as you like. When you’re done making changes, you update the remote repository so that other team members can access the updated code. This lets you work independently, while also collaborating and keeping in sync with others. In the EEEN11202 labs you’re working by yourself, but we’re still going to replicate this process (and use it for the Gradescope submissions) so that you gain experience in this industry standard process.
Press the Sync Changes. Press this and the changes will be pushed to the remote repository.
Screenshot of VSCode, software from Microsoft. See course copyright statement.
You may be asked to confirm you want to do this before it takes effect. If so, press OK.
Enter two commands, one after another.
git fetch
git push
You should be able to then go back to the GitHub website. If you click on the file(s) you’ve changed, you’ll see the new version.
2.2.2.4. Rolling back changes
A key reason for using version control is that it lets you roll back changes if you make a mistake. There are no hard rules for how often you should commit your code, but in general if you have something that works, do a commit. Then you have a working version you can go back to if you change something and it stops working later on.
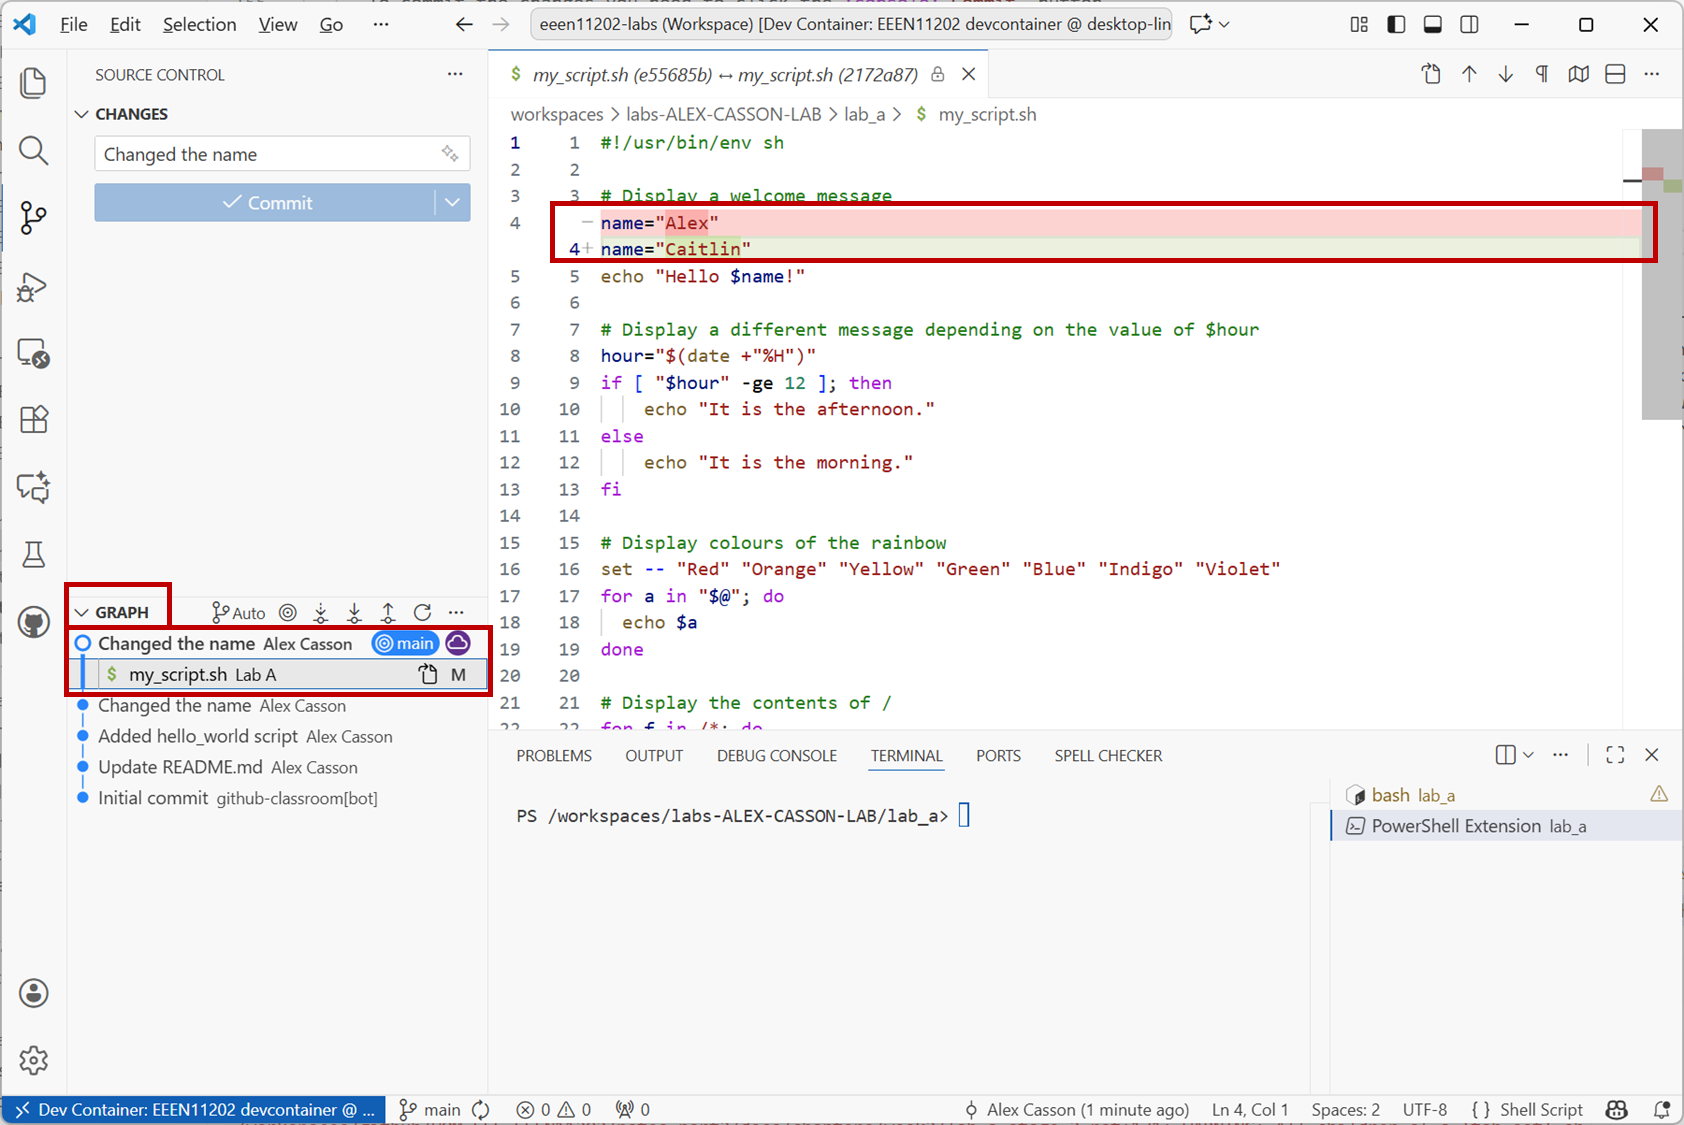
If you click on Graph in the bottom left of VSCode window, VSCode will display a list of all the commits you’ve made. (Graph may be at the bottom of the screen rather than mid-way up as in the screenshot below.)
You can click on a file, and it will show the differences for you. This can be very useful when trying to figure out why something is no longer working.
Screenshot of VSCode, software from Microsoft. See course copyright statement.
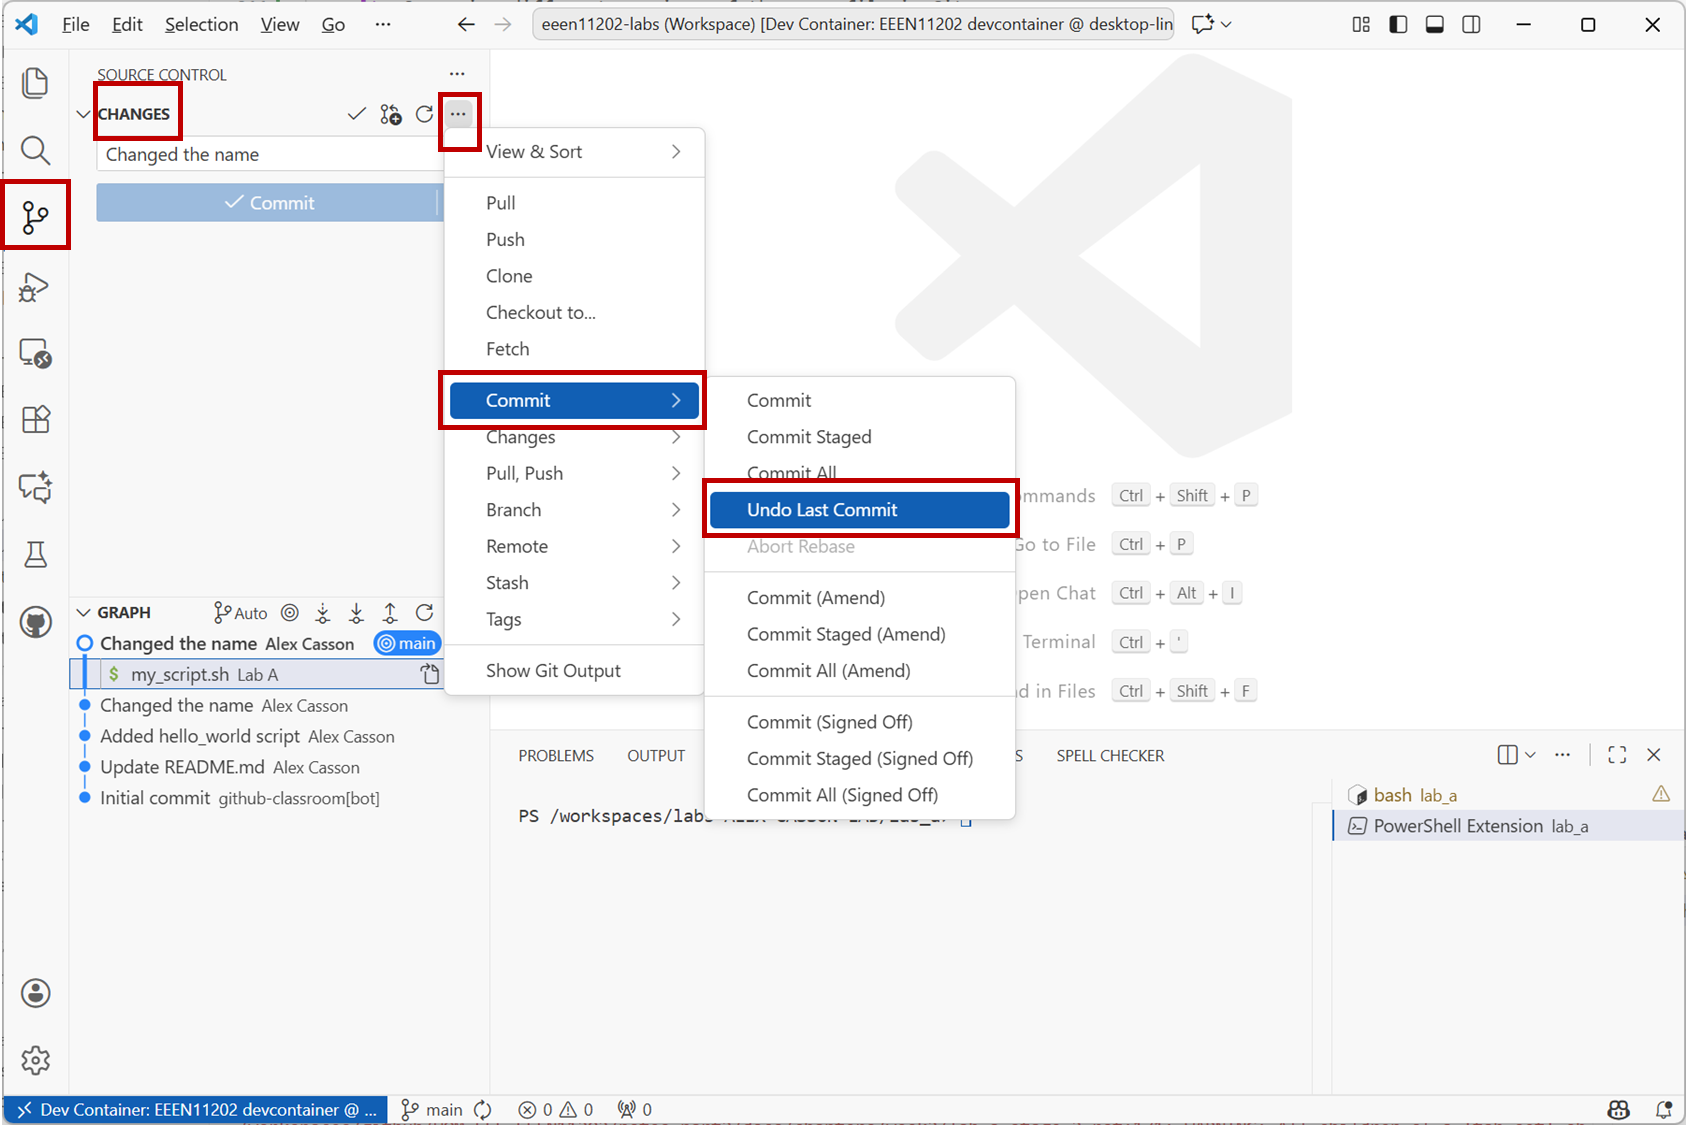
To undo the last commit and role back to the previous version you can:
Click on the ... near CHANGES in the Source Control tab. Note these only when you place the mouse in that area. Then select Commit / Undo Last Commit.
Screenshot of VSCode, software from Microsoft. See course copyright statement.
Enter the command
git revert HEAD
You can of course compare files from any version of your code, and roll back to any previous version, not just the most recent ones as the commands above do. We won’t cover these here though.
2.2.2.5. Going further
There’s lots more than you can do with the version control. We’ll cover more in future labs. For now, explore the VSCode interface a bit more. Explore different options and settings. Try making more changes to your scripts. Then move on to the assignment.