3.2.2. Common Python commands
We’ve now learnt how to make and use a virtual environment, and have written some simple Python programs.
Part 1 of the notes introduced a wide range of fundamental programming concepts, often giving examples using Python code. We’ve already seen some of these concepts, such as functions. In this part of the Lab we’ll take a look at some of the others.
3.2.2.1. Variables
Make a new Python file with any suitable name. Make sure you save it in your Lab C folder.
Enter the commands below into this file:
# %% Define variables of different types
num = 2
pi_ish = 3.1415
name = "alex"
check = True
blank = None
These were the first examples of variables we introduced in Part 1 of the notes.
Note
Note that we didn’t ask you to enter
if __name__ == "__main__":
    num = 2
    pi_ish = 3.1415
    name = "alex"
    check = True
    blank = None
Placing the code inside a
if __name__ == "__main__":isn’t mandatory. Indeed for data analysis tasks and simple automation scripts it’s fairly common not to use aif __name__ == "__main__":block. However, not having aif __name__ == "__main__":block makes unit testing, which we’ll learn about in Lab D, harder. It also makes it more difficult to reuse code in other programs viaimportstatements. For these reasons, it’s generally good practice to include aif __name__ == "__main__":and place your code under this. This is what we will do for most of the course.However, we’ve not learnt about the debugger yet. We’ll learn about that in Lab D too. Without the debugger, it’s easier to place things outside of a
if __name__ == "__main__":block for now. We can then use the Jupyter variable explorer to see the values of variables, as we did in Lab B.A hash
#in Python indicates the start of a comment.# %%is a special type of comment that indicates the start of a code cell in some Python editors, such as Visual Studio Code. This is exactly the same as the cells we encountered in Lab B. We can run each cell independently. This is useful for testing small sections of code without having to run the entire program.Click on
Run Cellwhich appears above the# %%.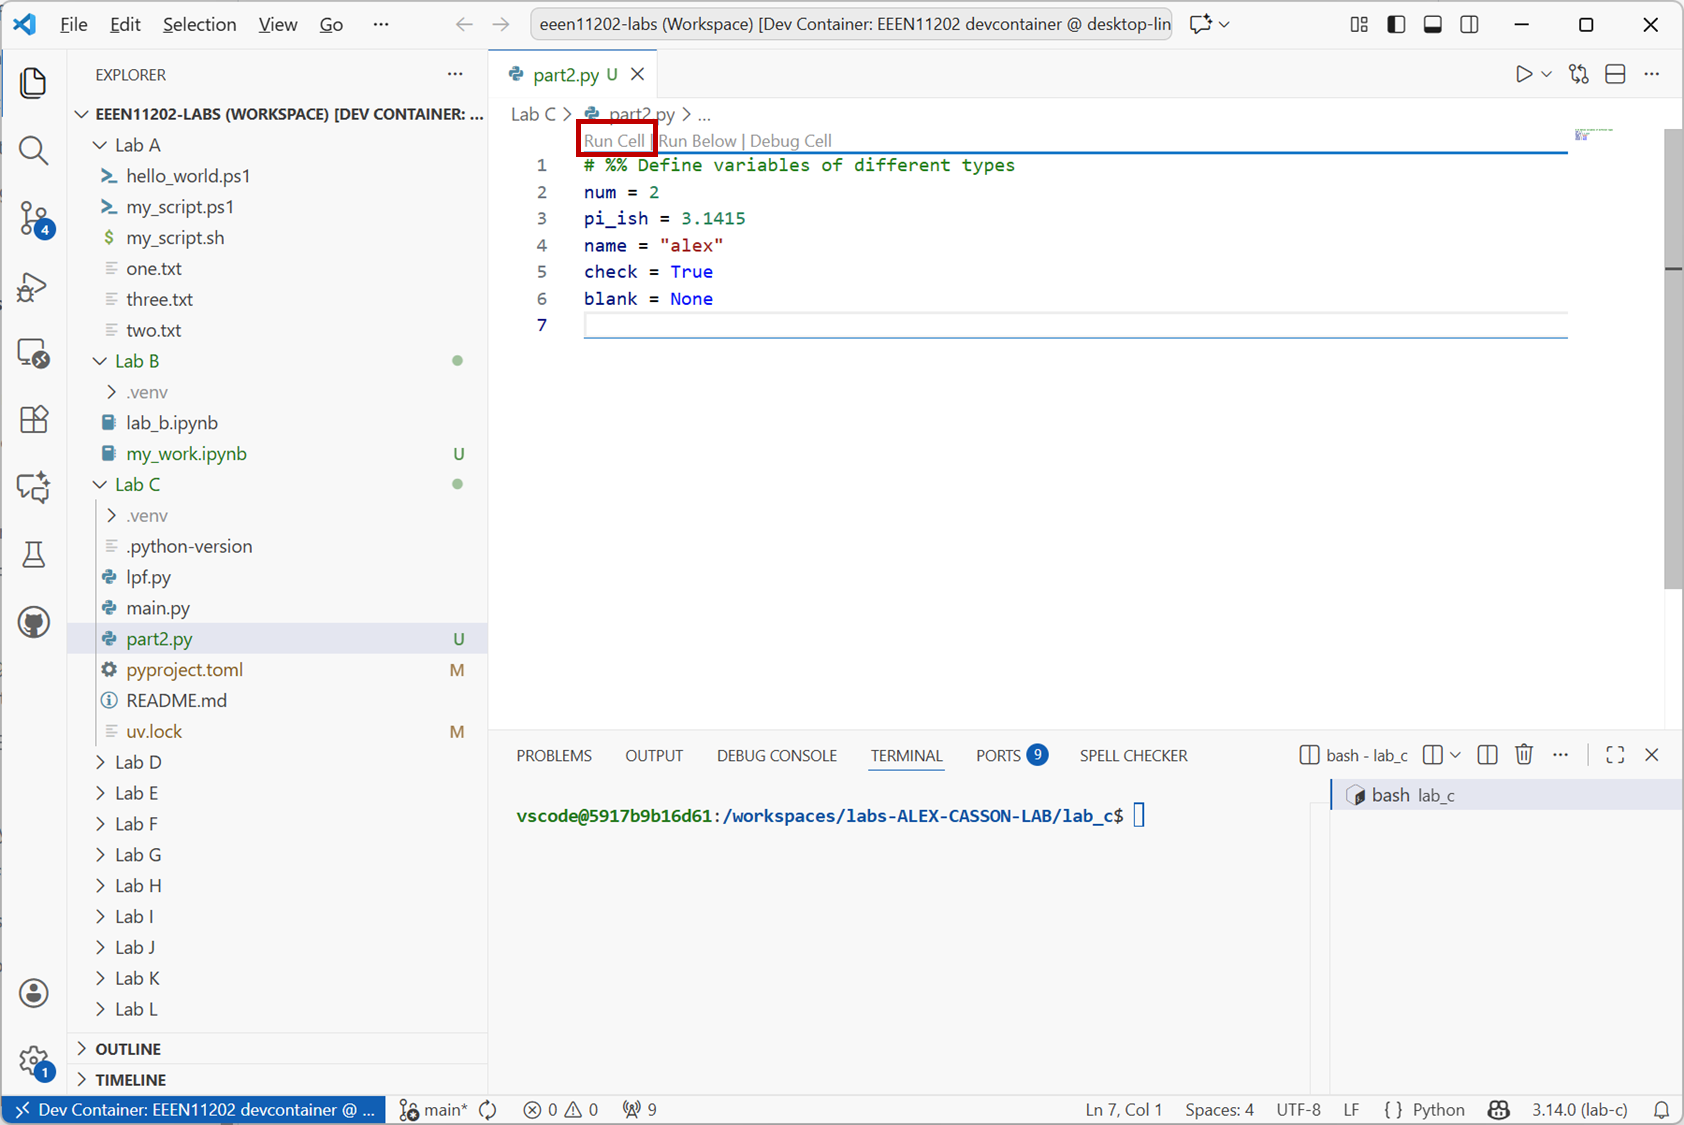
Screenshot of VSCode, software from Microsoft. See course copyright statement.
This will start an interactive session, and once the code has finished running it will display the values of the variables in the Jupyter variable explorer.
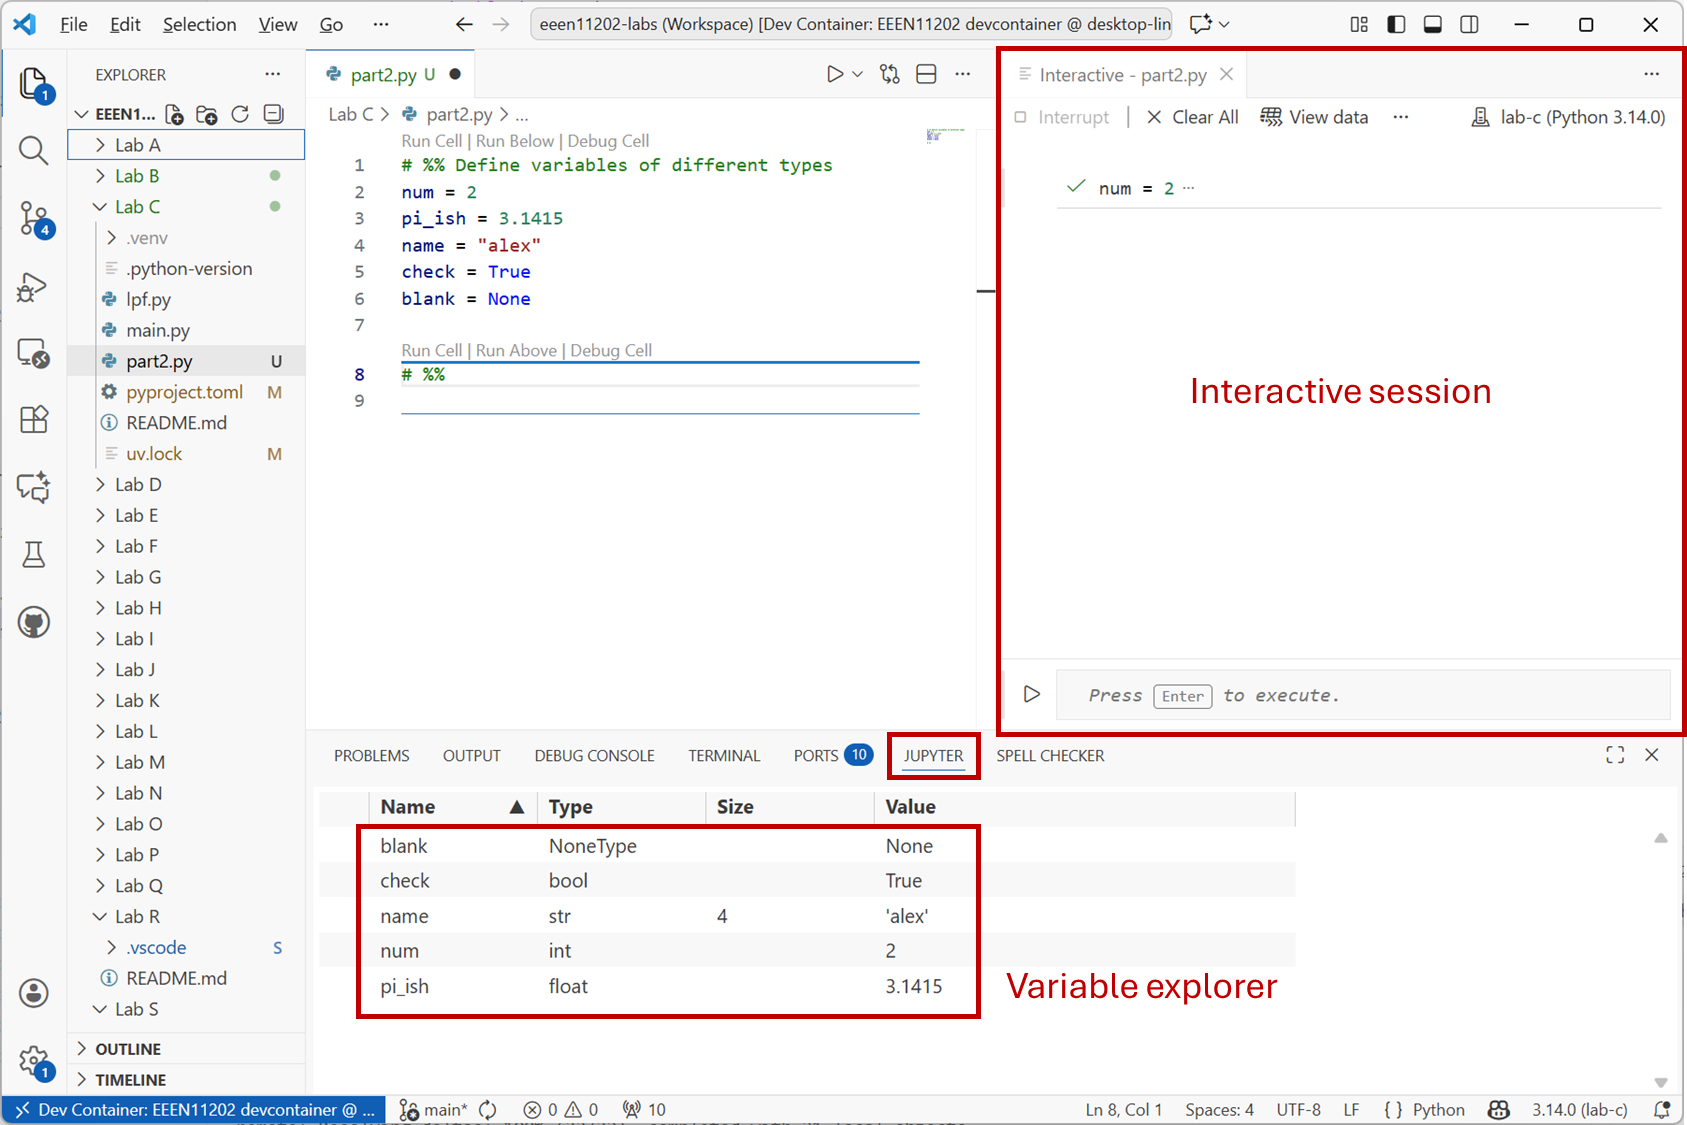
Screenshot of VSCode, software from Microsoft. See course copyright statement.
Add the code below to your file.
# %% Simple variable combinations
five_ish = num + pi_ish
full_name = name + " casson"

logical_and = check and False
logical_and2 = check and True
logical_or = check or False
logical_or2 = check or True
Run the cell and view the results in the variable explorer, which should look like the below.
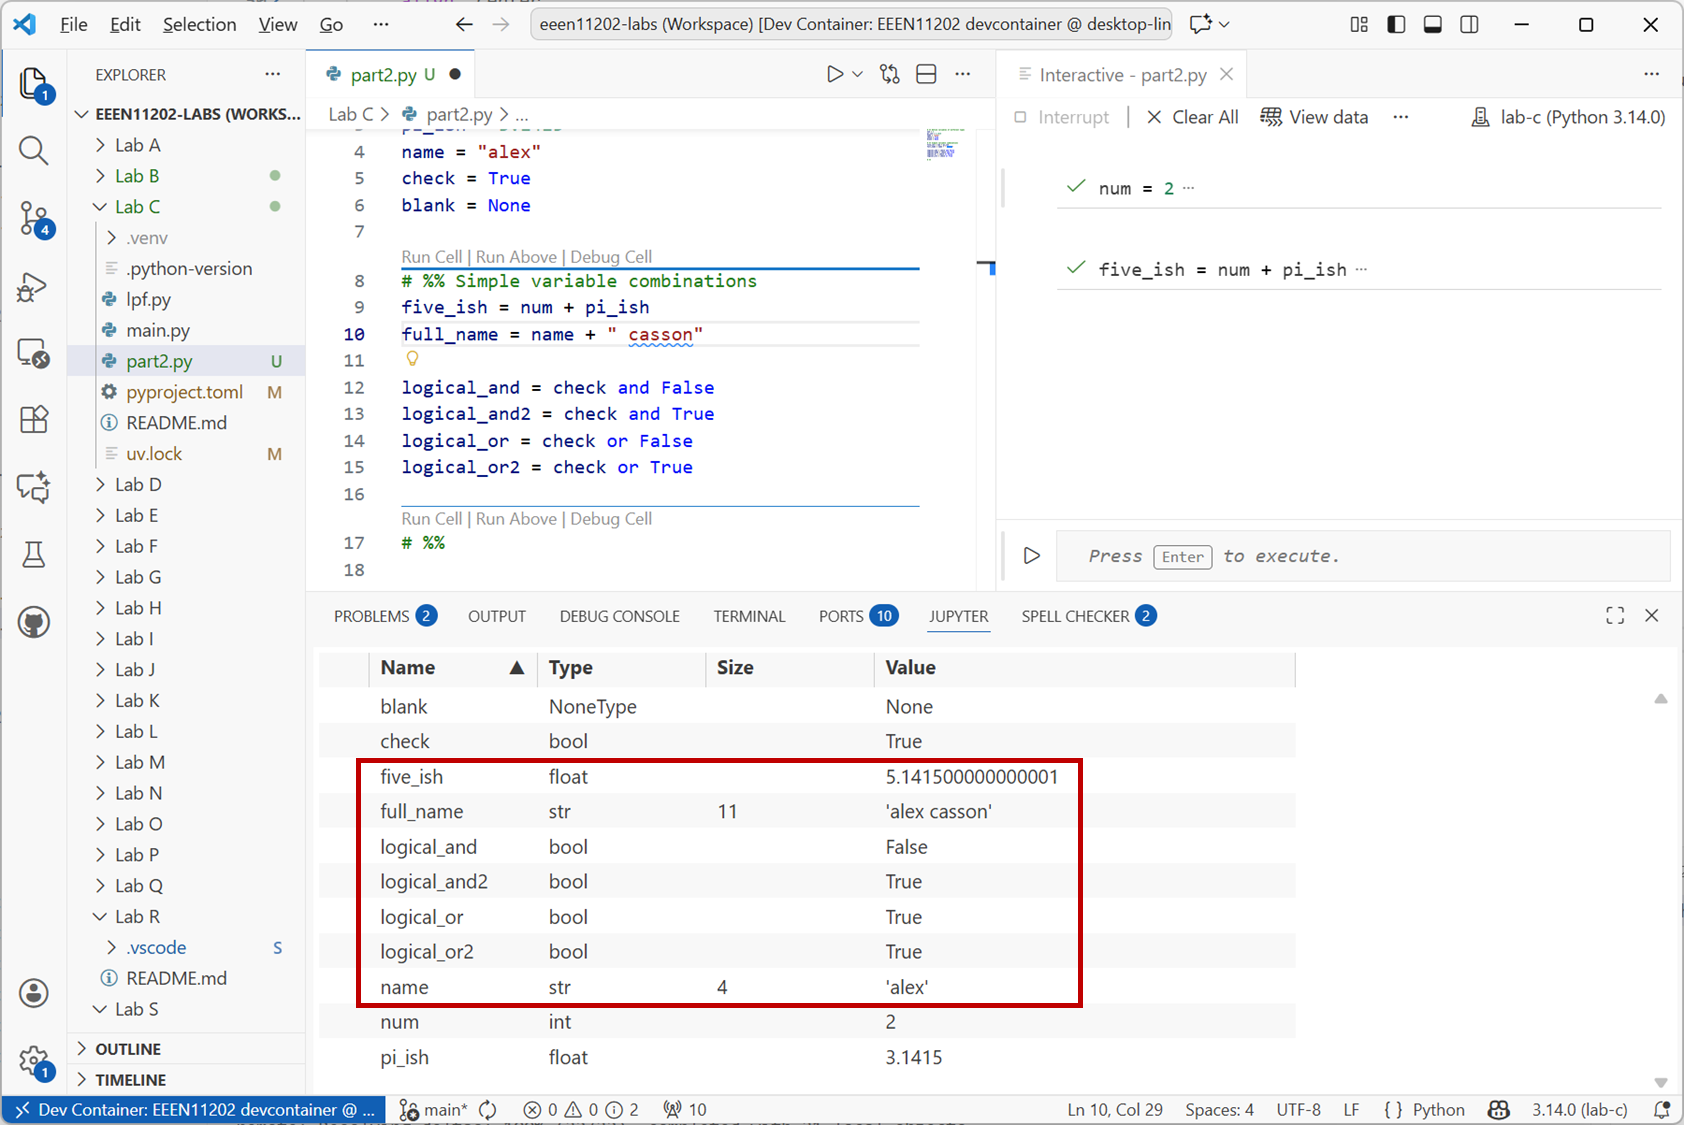
Screenshot of VSCode, software from Microsoft. See course copyright statement.
The operator
+does different things depending on the data type of the data given to it.When given two numbers,
numandpi_ish, it adds them together. If you look closely at the variable explorer, you’ll see thatfive_ishis a float data type, because one of the inputs was a float.numis an integer data type, but an int can be automatically converted to a float when needed. (Remember that an int can’t store numbers with decimal places.)When given two strings,
nameand" casson", it concatenates (joins) them together. You get one longer string,"alex casson"here.
The operators
andandorare logical operators that operate on boolean data types. They work in exactly the same way as the logic gates that you’ve learnt about in your digital electronic course.Add code to your Python file to work out the output
qof the digital circuit below whena = 0,b = 1,c = 1andd = 0.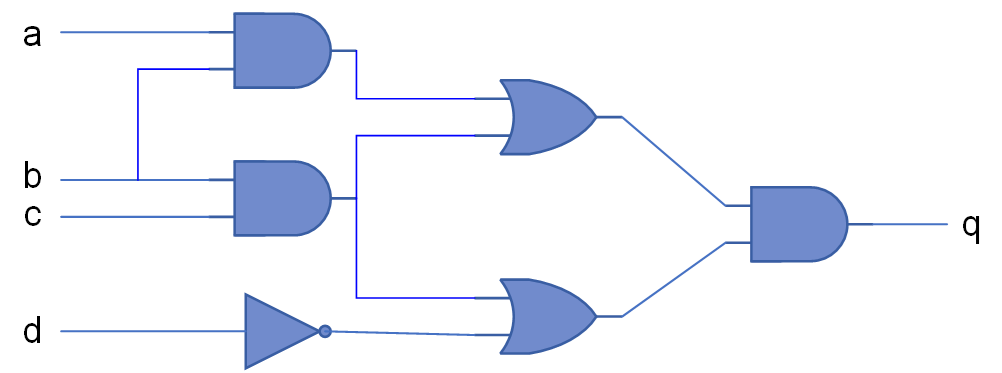
Solution
# %% Digital logic circuit
a = False
b = True
c = True
d = False

e = a and b
f = b and c
g = e or f
h = f or not (d)

q = g and h
3.2.2.2. Objects
In your Python file, make a list by adding the code:
# %% Lists
my_list = [0, 4.5, "hello"]
A list is a data structure that can hold multiple values. The values in a list can be of any data type, and can even be other lists.
A list storing items is also an object. There are a number of built-in methods that can be apply to the list. This may tell us information about it, or help us to add or remove data, or so on.
We’ll learn about making our own objects in Lab G. For now, we just want to remember that pretty much everything we enter into Python is actually an object and has built-in methods that we can use with it.
In VSCode, enter the below, but don’t try to run the code yet.
# %% Lists
my_list = [0, 4.5, "hello"]
my_list.
You should see that the auto-complete appears and displays a list of the available methods for this object called
my_list. For example there are methods to add items to the list, or to change the order of items in the list.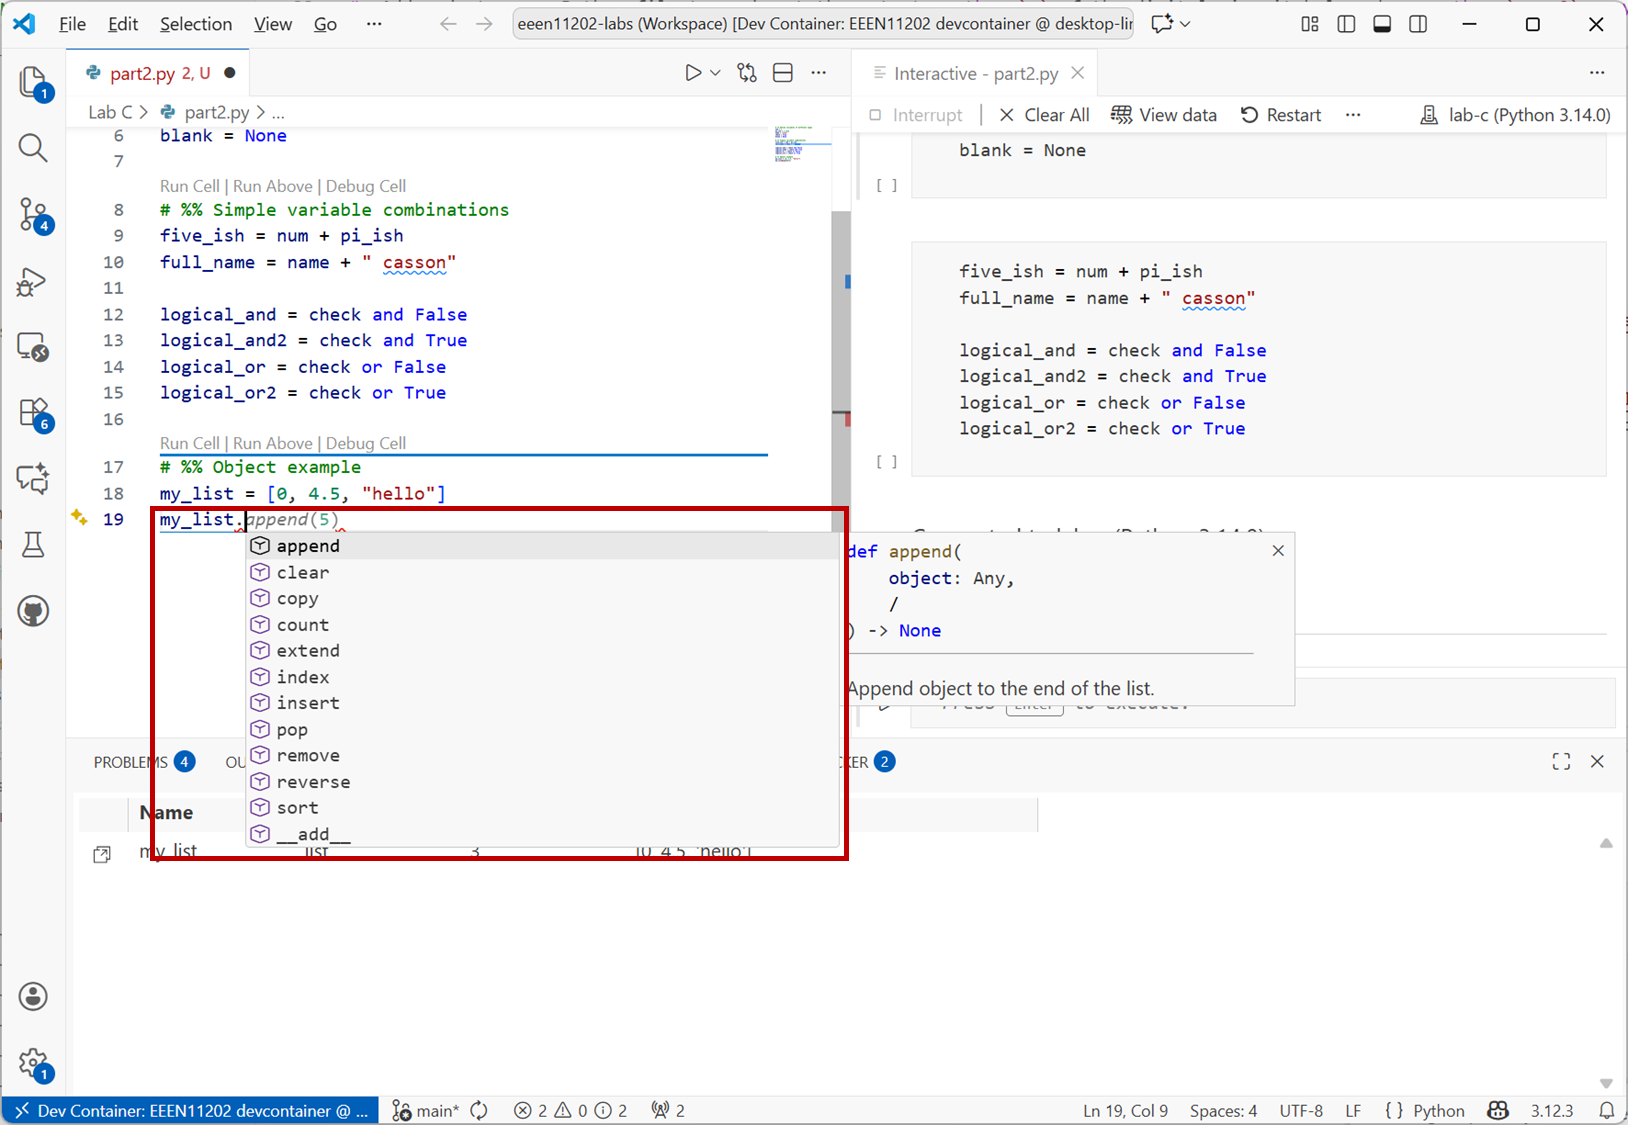
Screenshot of VSCode, software from Microsoft. See course copyright statement.
Advanced notes
You’ll see that some of the available methods start/end with either a single underscore
_or double underscore__. These have particular meanings in Python.Briefly, a single underscore
_indicates that the method isn’t for you the user, it’s for use by the object itself. Some programming languages allow private methods which are hidden from users. Python doesn’t, it uses an underscore_in the method name to indicate methods for the object itself.A double underscore
__is known as a dunder. All objects will have a range of built in dunder methods which provide default functionality. For example__init__controls how an object is initialized when it is created. These are needed when defining your own objects, which we’ll learn about in Lab G.Now enter the code
# %% Lists
my_list = [0, 4.5, "hello"]
my_list.append(5)
my_list.reverse()
Run it, and see the results in the variable explorer. Check the contents of
my_listmatch what you expect.There’s much more that you can do, and likely will need to do, with objects. The aim here is just a brief introduction. Remember that pretty much everything in Python is an object, and has methods that you can use with it.
From earlier in the lab, your code file should contain a variable called
five_ish. This is a variable, which is actually stored as an object and so has methods associated with it. Enter:five_ish.
to let the autocomplete show the methods that are available for manipulating this data. Experiment with a few before moving on.
3.2.2.3. Conditionals
Conditionals let us change the flow of a program based on the values of variables and objects.
Add the code below to your Python file and run it. What value of
cdo you get, and is it what you would expect?# %% Conditionals a = 0 b = 3 if b == a: c = 7 elif a > b: c = -7 elif a < b: c = 0 else: raise Exception("Something must have gone wrong!")
There are a few points to note with this example.
There are four different branches here, comparing the values of
aandb. Only one branch will execute, the first one which is matched.To check whether
aandbare equal, we need to use two equals signs==. A single equals sign=is used to assign a value to a variable, not to compare two values. Try changing the line toif b = a:and see what happens when you run the code.We’ll cover error handling in Lab H. In general, we would recommend using
ifandelifto cover every case you might be interested in, and thenelseto catch any unexpected cases and raise an error.Note that in the solution to the digital logic circuit above, we already used variables names
a,b,c. There they were used to storeTrueorFalserather than numbers. Remember that Python is dynamically typed, we can change what’s stored in our variables at any time. However, this can lead to confusing code - if you later write a block of code that is still expectinga,b,cto store logic values, and they now store numbers, you might get strange behavior. Either give your variables unique names, or ensure variables with the same name are in different scopes so they don’t interfer with one another.
The example above compares numbers, but you can compare lots of different things. Add the code below to your script and run it:
if name == "alex":
    print("True")
By searching the Internet or otherwise, add an
ifstatement to your code that displaysAlso trueifnamecontains anx.Solution
if "x" in name:
    print("Also true")
You can also use logical statements such as
and,or, andnotto build up more complicated comparison cases. Add the code below to your script and run it. (This assumes that the result from your digital logic example above is stored in a variable calledq).if name == "alex" and num == 2: print("Both true") elif name == "alex" or num == 2: print("One true") elif not q: print("q is 0")
Note that the
elifstatements are only checked if the previousiforelifstatement was not true. Only one of these outputs will ever be displayed.When you have lots of comparisons to do, using lots of
ifandelifstatements can be quite cumbersome. Python provides amatchsyntax to allow some cases to be written more simply. For example, add the code below to your code and run it. Does it do what you expect?from datetime import datetime day = datetime.now().strftime("%A") match day: case "Saturday" | "Sunday": print(f"{day} is a weekend.") case "Monday" | "Tuesday" | "Wednesday" | "Thursday" | "Friday": print(f"{day} is a weekday.") case _: # default case, runs if no others match raise Exception("Something must have gone wrong!")
Solution
Exactly what this code displays will vary depending on which day of the week the code is run.
datetime.now().strftime("%A")gets the current day of the week and stores it inday. This is then used with thematchstatement.
3.2.2.4. Loops
Loops let us perform the same operation multiple times. This is very common in programming, with a common aim being to automate repetitive tasks.
Add the code below to your Python file and run it.
# %% For loops
countdown = range(10,-1,-1)
for i in countdown:
    print(f"{i}")
print("Blast off")
This is a fairly simple loop.
countdowncontains the numbers from 10 to 0. Theforloop iterates through each of these in turn, gets the current number and puts it in a variable calledi, and prints out the number.The
insyntax can be a little confusing at first, as some of the operation is hidden behind the scenes. For any data type that stores multiple values Python has a rule for iterating over these multiple values. For a list, or range, or series of numbers or similar, this rule is built in and you don’t see it. The iterator simply says, get the first entry, e.g.countdown[0], thencountdown[1], thencountdown[2], and so on. Essentially, Python just knows that it needs to go through each item in the list or range in turn. This is in contrast to some other programming languages (particularly C/C++) where you need to tell the program explicitly what to do differently on each loop, which element to get, and so on.You can make your own custom iterators if you want different behavior, or are working with your own data types, but we won’t cover those here.
Make a for loop that displays the numbers 0 to 10 going upwards. That is, displays, 0, 1, … 10.
Solution
# Simplest approach is likely to change the range, rather than to change the loop
countup = range(0, 11)
for i in countup:
     print(f"{i}")
For a more complicated loop, copy and paste the code below into your file and run it.
marks = {"a": 100, "b": 100, "c": 75, "d": 10}

for student in marks:
    if marks[student] < 40:
        pass_status = "failed"
    elif marks[student] > 40:
        pass_status = "passed"
    else:
        raise Exception("Something must have gone wrong!")

    print(f"{student} has {pass_status} with {marks[student]} marks.")
The
forloop iterates through each student, and theifstatements check whether they passed or failed the course, changing the message that is displayed as appropriate.This uses a dictionary to store student names (here
"a","b", etc.) and their marks. The name is the key, and the mark is the data stored associated with that key. The iteration rule for a dictionary is to go through each key in turn.Make sure that you understand this code before moving on.
The code above contains a logic error. There is no bug in the code, it will do exactly what it is told to do, but there is a mistake in what we’ve asked it to do. It can be hard for our debugging tools to spot such issues, because the issue is more with us rather than with the code. Identify this issue and fix it.
Solution
There is no explicit coverage of what happens if the student mark is 40. This is a pass mark, and so the condition should be
elifto beif marks[student] >= 40:.Note that we also don’t have any checks that ensure the mark is
>0, or<100. It would probably be sensible to add such checks, at some point in the code, to help detect any errors that might have crept in. Or, and probably better, create a custom data type/object which only accepts numbers 0 to 100 as a valid input.
3.2.2.5. Reading and writing data to/from files
So far we’ve mainly interacted with our Python programs by typing things in. It’s very common that we also want our Python to read information from other files. For example, maybe we’ve run an experiment in the lab and saved the results. We want to load these in to Python to analyze them. Equally, it’s very common that we want to save the results generated by our Python program to a file. Later on, this lets us see the results just by opening the file, rather than by having to re-run the code.
There are lots of different file formats, for a example Word files, Excel files, and so on. Python has specialist functions for working with many of these particular types of file, and we’ll see a number of these as we work through the course.
There are also some very basic commands that let you read and write simple files, which we’ll look at here.
In your Lab C files you will see that we’ve included a file called
data.txt. Add the code below to your Python file and run it. The code will open the file, and read the contents into a variable calleddata.# %% Read data from a file filename = "data.txt" with open(filename, "r") as f: data = f.read().splitlines()
View
datain the variable explorer to check that it contains what you would expect.To go over this code:
withis known as a context manager. We discussed previously that if we use a resource on a computer, when we finish we have to give it back. Otherwise we’ll keep using up system resources we don’t need. Here we’re opening a file, and so we need to close it when we’re finished with it. The context manger takes care of doing this for us. If you don’t use a context manager, you need to remember to callf.close()when you’re finished with the file.open(filename, "r") as fopens the file, and here we’ve asked to read"r"from the file.fis the name of where we’re storing the opened file to interact with it. You can call this whatever you like, but we’ve chosenf.f.read().splitlines()reads the contents of the file, and splits them into a list where each entry is one line from the file. We don’t have to usesplitlines(). There are other methods such as.readlines()which return similar but slightly different results.
When you run the code above, what are the contents of data[2]?
Solution
'100'Remember that Python starts counting from 0, so
data[0]is the first line in the file,data[1]is the second line, anddata[2]is the third line, and so on.You’ll notice that this is
'100', not100. That is, it’s been stored as a string, not as a number.You can convert between data types using built-in functions such as
int(),float(), andstr(). For example, to convert the third line of the file to an integer, you would useint(data[2]).To write data to a file, the process is very similar. Add the code below to your Python file and run it. This will write some text to a new file called
output.txt.# %% Write data to a file output_filename = "output.txt" with open(output_filename, "w") as f: f.write("Hello world!")
Check that the file
output.txthas been created in your Lab C folder, and that it contains what you would expect.
3.2.2.6. Extending the RC circuit example
In the first part of this lab we finished by making a script that would simulate a simple RC circuit. It asked the user to enter a frequency, and then it calculated the output voltage magnitude and phase at that frequency. The code to do this is repeated below if you need it.
Starting code
"""
Calculate the output voltage magnitude and phase of an RC low-pass filter
"""

import cmath
import math


def calculate_circuit_output(f):
    """
    Calculate the output voltage magnitude and phase of an RC low-pass filter
    given an input frequency f in Hz.
    Returns: vout_mag: output voltage magnitude in Volts
             vout_phase: output voltage phase in radians
    """

    # Calculate input
    w = 2 * math.pi * f  # rad/s
    a = 5  # input amplitude in Volts
    v_in = a * cmath.exp(1j * 2 * math.pi * 160000)

    # Define the circuit
    z1 = 1  # kOhm
    c = 1e-9  # Farads
    z2 = 1 / (1j * w * c)
    v_out = (z2 * v_in) / (z1 + z2)  # Volts

    # Calculate magnitude and phase
    vout_mag = abs(v_out)
    vout_mag_db = 20 * math.log10(
        vout_mag / a
    )  # remember to divide by the input amplitude
    vout_phase = cmath.phase(v_out)

    return vout_mag_db, vout_phase


def display_results(vout_mag, vout_phase):
    """Display the output voltage magnitude and phase using an f string"""
    print(f"Output voltage magnitude: {vout_mag} dB")
    print(f"Output voltage phase: {vout_phase} radians")


if __name__ == "__main__":
    f = input("Enter frequency in Hz: ")  # remember f will be a string
    vout_mag, vout_phase = calculate_circuit_output(float(f))
    display_results(vout_mag, vout_phase)
Make a new Python file with any suitable name.
Modify the code above so that instead of asking the user to enter a single frequency, it reads the information from a file.
In your Lab C folder you’ll find a file called
frequencies.txtwhich contains a frequency to start at, a frequency to end at, and a step size to take between each frequency to test. (It also contains some text indicating which number is which.) Read these values from the file.You can assume that the numbers will always be integers.
For each frequency tested, have Python display the frequency, and the magnitude and phase of the output voltage. Display the frequency to 1 decimal place, and the magnitude and phase to 3 decimal places.
We’ve kept this task fairly open ended for you to think about how you want to approach it. You’ll likely need to look up some functions, on the Internet or via AI, to figure out how to carry out each step. A number of different modifications will be needed in order to achieve the functionality.
Hint
If you don’t know where to start, or are struggling, before starting to make any changes to the code, think about the steps that are going to be needed. You can then make each step work in turn. You probably need to work along the lines of:
In the starter code
f = input("Enter frequency in Hz: ")is used to ask the user to enter a single frequency. We want to replace this with code that reads the information from the filefrequencies.txt.Once you’ve read in the contents of
frequencies.txtyou need to extract the parts that you want. It contains text, which we can ignore, we just need to get the numbers.One you have the start frequency, stop frequency, and step size you can then put
calculate_circuit_output()in aforloop to run it as many times as needed.Modify
display_results()as appropriate.
Solution and optional challenge
"""
Calculate the output voltage magnitude and phase of an RC low-pass filter
"""

import cmath
import math


def calculate_circuit_output(f):
    """
    Calculate the output voltage magnitude and phase of an RC low-pass filter
    given an input frequency f in Hz.
    Returns: vout_mag: output voltage magnitude in Volts
             vout_phase: output voltage phase in radians
    """

    # Calculate input
    w = 2 * math.pi * f  # rad/s
    a = 5  # input amplitude in Volts
    v_in = a * cmath.exp(1j * w)

    # Define the circuit
    z1 = 1  # kOhm
    c = 1e-9  # Farads
    z2 = 1 / (1j * w * c)
    v_out = (z2 * v_in) / (z1 + z2)  # Volts

    # Calculate magnitude and phase
    vout_mag = abs(v_out)
    vout_mag_db = 20 * math.log10(
        vout_mag / a
    )  # remember to divide by the input amplitude
    vout_phase = cmath.phase(v_out)

    return vout_mag_db, vout_phase


def display_results(f, vout_mag, vout_phase):
    """Display the output voltage magnitude and phase using an f string"""
    print(
        f"Frequency: {f:.1f} Hz, Magnitude: {vout_mag:.3f} dB, Phase: {vout_phase:.3f} radians"
    )


def load_frequencies():
    """Load frequencies from a file and return them"""

    # Load data from file
    filename = "frequencies.txt"
    with open(filename, "r") as f:
        data = f.read().splitlines()

    # Extract number part of each string
    num = []  # preallocate
    for i in range(len(data)):
        num.append([int(x) for x in data[i].split() if x.isdigit()][0])

    # Put into output format - this is the part that needs changing for the optional challenge
    start = num[0]
    stop = num[1]
    step = num[2]

    return start, stop, step


if __name__ == "__main__":
    start, stop, step = load_frequencies()
    for f in range(start, stop + 1, step):
        vout_mag, vout_phase = calculate_circuit_output(f)
        display_results(f, vout_mag, vout_phase)
The above code will work, but is a little fragile. The lines
start = num[0]
stop = num[1]
step = num[2]
are hard coded. They assume that the first line of the file will have the start frequency, the second line the stop frequency, and the third line the step size. If the file format changes, or the user doesn’t create that file correctly, the code will break.
As an optional challenge, add a match statement that uses the text part of the file loaded in to assign the correct value to the correct variable, whatever order they are in in the file. (We won’t provide a solution for this optional challenge, but feel free to ask a demonstrator to look at your solution.)
Check in your code to Git before moving on. The instructions are the same as in the first part of this lab.