5.3.1. Exceptions and error handling
5.3.1.1. Initial setup for the Lab
In the VSCode terminal enter:
cd /workspaces/`ls /workspaces`/lab-h uv init .
Remember to enter these one at a time, not both together.
This will make a new Python project in the current folder. It will be named automatically after the folder name.
To analyze these lines:
cd /workspaces/`ls /workspaces`/lab-hmakes sure we are working in the lab-h folder.uv init .is the interesting command. It makes a simple pyproject.toml file to define the project. (The actual virtual environment is made automatically when we run code.)
The above will make the a
pyproject.tomlfile, amain.pyfile, and a number of others.Add some structure to your folder by entering the commands:
mkdir tests docs
mv main.py src
uv run src/main.py
touch tests/__init__.py
Here we’ve moved
main.pyinto thesrcfolder. You’ll see that thesrcfolder contains some code that we’ve written for you.We’ve made a
testsfolder for any tests that we might want to write later, and adocsfolder for any documentation. We won’t ask you to put anything into these as part of the lab instructions, but you might want to write some tests for your code to check that it’s working!In the files that were downloaded from Git automatically, you’ll also see there’s a folder called
data. This contains some files that we’ll analyze during the lab.
Install the required dependencies for this lab by entering the command:
uv add numpyRun
uv run src/main.pyto make sure the virtual environment is built.
When you open a Python file, make sure that the correct Python virtual environment is activated. See the instructions in Lab D if you’re unsure.
5.3.1.2. Raising exceptions
In your Lab H
srcfolder, edit the filemain.pyto contain:class MyError(Exception): """An example custom exception""" pass def main(): print("Hello from lab-h!") x = 101 raise MyError("Message to display to the user") if __name__ == "__main__": main()
Run this code.
You should see that the code runs,
Hello from lab-h!is displayed, and then the programs ends with an error. This error has a custom name and message, the ones we asked for in the code. This is shown in the screenshot below.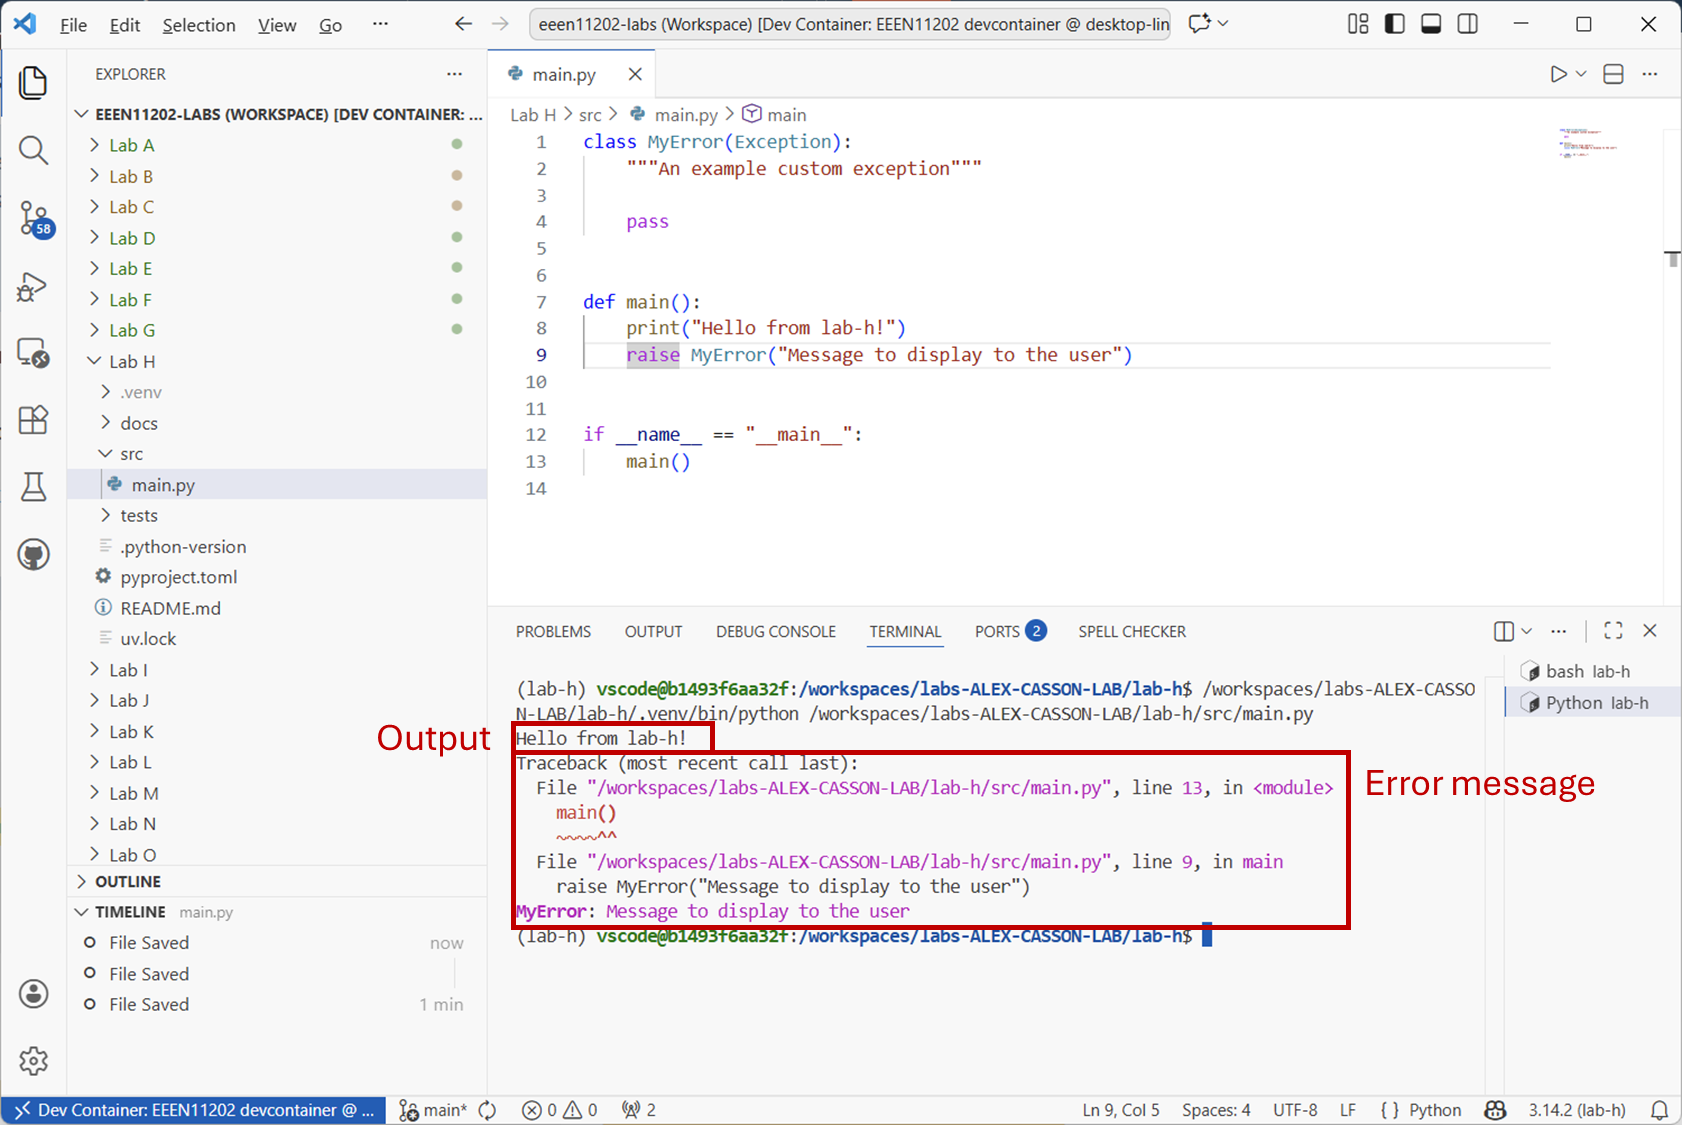
Screenshot of VSCode, software from Microsoft. See course copyright statement.
To look at this code:
Remember that Python runs from the top to the bottom of the file. We
raise()the error on Line 9, so the program stops running at that point. Everything before this runs as usual.The terminology is that we are raising an exception. This means that something has gone wrong, and normal program execution cannot continue. There is a command called
raiseto do this.Each exception has a type. This helps with debugging, we can have different types of exceptions for different problems. Here the code in
class MyError(Exception):makes a custom exception type calledMyError. We could give this any name we like, something informative for whoever is using the code to help them figure out what went wrong.When the error is displayed to the user, a traceback is also shown. This shows where in the code the exception occurred, to help with debugging.
To a first approximation, that’s it! You can make as many custom exceptions as you like. You can put the
raisecommand wherever you like in your code. It might be common to put it inside anifstatement, to check if something has gone wrong, and raise an exception if it has. There are a wide range of further behaviors that you can add to your custom exceptions, but we won’t cover these here. For many cases, just giving a meaningful name and message is enough to help with debugging.Add an
ifstatement to the code so that the exception is only raised ifxis greater than 100. Display the value ofxin the message to the user. Try running your code with different values ofxto check that it works.Solution
def main():
    print("Hello from lab-h!")
    x = 101
    if x > 100:
        raise MyError(f"x was {x}. It should be 100 or less.")
In addition to using custom names for exceptions, there are a wide range of built in named exceptions that you can use without having to make your own. A list is available online, so we won’t go through them all here. Probably the some of most common ones you might like to use early on are:
ValueErrorwhen a value is not in the expected range.TypeErrorwhen the data types is wrong, such as you were expecting a string (say to represent a name) but got a number instead.FileNotFoundErrorwhen you try to open a file that can’t be found in the location you specified.
In your code, change
raise MyError(...)to raiseraise ValueError(...)instead. See how the output differs between the two types of exception.
5.3.1.3. Raising warnings
Not every exception has to represent an error. You can also represent warnings. Add the code below somewhere in your
main.pyfile, and run it.raise DeprecationWarning("This code is deprecated and will be removed in future versions.")
This type of warning is intended for other developers using your code. Sometimes we have methods and functions in, say version 1 of the code, that for whatever reason will be removed in version 2. You can add this warning to let other developers know that they should avoid using this code as it will be removed in future versions.
If you want a custom warning, or more control over built in warnings, there is a dedicated module in the standard library called
warnings. This module provides more control over how warnings are displayed to the user. Replace the code in your file with that given below.import warnings class MyError(Exception): """An example custom exception""" pass class MyWarning(UserWarning): """An example custom warning""" pass def main(): print("Hello from lab-h!") x = 99 if x > 100: raise ValueError(f"x was {x}. It should be 100 or less.") # Remember the code only gets to this point if there were no exceptions raised above. warnings.warn("This is a custom warning from lab-h.", MyWarning) if __name__ == "__main__": main()
Here we’ve made a custom warning type with
class MyWarning(UserWarning). We then called the warning withwarnings.warn(...). Run this code, and see how the warning is displayed to the user.Refer back to Lab D where we covered the
loggingmodule. If you add the line:logging.captureWarnings(True)
(in addition to the other logging setup steps in Lab D) then your warnings will be automatically in the log file.
Add logging to your code and check that you can log your custom warning.
Solution
import logging
import warnings

logging.captureWarnings(True)
logger = logging.getLogger(__name__)


class MyError(Exception):
    """An example custom exception"""

    pass


class MyWarning(UserWarning):
    """An example custom warning"""

    pass


def main():
    print("Hello from lab-h!")
    x = 99
    if x > 100:
        raise ValueError(f"x was {x}. It should be 100 or less.")

    warnings.warn("This is a custom warning from lab-h.", MyWarning)


if __name__ == "__main__":
    # Set up logging
    log_filename = "log.txt"
    logging.basicConfig(filename=log_filename, level=logging.WARNING)

    # Run main function
    main()
5.3.1.4. Handling exceptions
Raising an exception is great, but you then need to decide what you want to do. This is known as handling the exception. In the examples above we just let the program terminate and display some debug information to the user. This might be what you want, particularly if the error is unrecoverable. However it might be that you want different behavior. For example, you might try and open a file with a particular name, and if it’s not present you try and open a different file with a default name instead. Alternatively, you might have a rule saying that if a number is over 100, you just automatically reset it to 100 as that’s the maximum it can be.
You handle exceptions using a
tryandexceptblock. Make a new code file and copy the code below into it. Run the code and see what happens with different values ofx.class Over100(Exception): """An example custom exception""" pass def print_x(x): """Print x, but only if it is less than 100""" if x > 100: raise Over100(f"x was {x}. It should be 100 or less.") print(f"x is {x}") def main(): print("Hello from lab-h!") try: x = 101 print_x(x) except Over100 as e: print(f"Caught an exception: {e}") else: print("No exceptions were raised.") finally: print(f"Done") if __name__ == "__main__": main()
To analyse this code:
tryis the code you want to run. It’s in atryblock because, for whatever reason, you think it might cause an error that you need to detect and handle. Here it runs theprint_x(x)function which will raise an exception ifxis too large.exceptgives the code for what you want to happen if there is an exception. Here we catch theOver100exception, and puts the automatically generated traceback in to a variablee. We can then useeto write a nice message to the user, not the full traceback from the exception.elsegives the code you want to run if there were no exceptions. Here we just print a message to say that everything was OK.finallygives code that will always run, whether there was an exception or not. Here we just print the value ofx.
You don’t have to have the
elseandfinallyblocks if you don’t want to, but they help give a lot of control over what happens in different situations.Change the code above so that if
xis greater than 100, it is automatically set to 100 instead of displaying anything to the user.Solution
try:
    x = 101
    print_x(x)
except Over100 as e:
    x = 100
else:
    print("No exceptions were raised.")
finally:
    print(f"x is {x}")
In the code above, we are specifically handling our custom
Over100exception. Try running the code withx = "hello".You’ll find that the program still crashes, and Python displays a
TypeErrorbecause we tried to compare a string to a number in theprint_xfunction.
Screenshot of VSCode, software from Microsoft. See course copyright statement.
To handle this, you can do one of two things.
You can change the
exceptblock to be justexcept Exception as e:. This will catch essentially all exceptions.(The better approach) you can add another
exceptblock to handle theTypeErrorspecifically.
Change your
try exceptblock to be:try: x = 101 print_x(x) except Over100 as e: x = 100 except TypeError as e: print("I was expecting x to be a number!") else: print("No exceptions were raised.") finally: print(f"x is {x}")
Then run your code with
x = "hello",x = 99,x = 101and tox = "101"to check it works as you expect.You can have as many
exceptblocks as you like. It depends on how comprehensive you want to be in catching and handling different errors your code might have.Note
x = "101"has two errors in it.xis too large, and it’s a string rather than a number. Our code here will only match one of these.If you need your code to be able to recover this from double error, you can put
tryblocks inside othertryblocks, or in theexceptblock call theprint_xfunction again after fixing the first issue. There are many ways to handle this, depending on what behavior you want.
5.3.1.5. Extending the student class example
In your Lab H src folder we’ve included two files, student_example.py and my_classes.py. These are a copy of the example in Lab G where we made a class for representing student marks. Here we’ve split the code into two files for better organization.
Run
student_example.pyand check it does what you expect.There is a commented out line
# student1.set_assignment_mark("c", "apple") # uncomment to test invalid inputthat you can uncomment to see what happens if invalid input is given.
In
student_example.pya number of the marks assignments are incorrect.The mark for an exam must be between 0 and 100.
The exam is marked in whole numbers (integers) only.
The mark for an assignment must be between 0 and 5.
Assignments are marked in whole numbers (integers) only.
Modify
my_classes.pyto raise appropriate exceptions if any of these rules are broken. You can use built in exceptions such asValueErrorandTypeError, or make your own custom exceptions.Solution
import numpy as np


# %% Set up custom exceptions and error checking functions
# These are called from the object classes below
class MarkIsText(Exception):
    """Error with exam mark not being a number"""

    pass


class ExamMarkOutOfRange(Exception):
    """Error with exam mark not being between 0 and 100"""

    pass


class AssignmentMarkOutOfRange(Exception):
    """Error with assignment mark not being 0, 1, 2, 3, 4, or 5"""

    pass


def check_exam_mark_validity(mark):
    if isinstance(mark, str):
        raise MarkIsText("Exam mark must be a number.")
    if mark < 0 or mark > 100:
        raise ExamMarkOutOfRange("Exam mark must be between 0 and 100.")
    if not isinstance(mark, int):
        raise ValueError("Exam mark must be an integer.")


def check_assignment_mark_validity(mark):
    # This is basically the same as check_exam_mark_validity() but with different valid ranges
    # Probably better to put both into a single function with parameters, but this is clearer for now
    if isinstance(mark, str):
        raise MarkIsText("Assignment mark must be a number.")
    valid_marks = range(0, 6)  # end value not included, so is 6 rather than 5
    if mark not in valid_marks:
        raise AssignmentMarkOutOfRange("Assignment mark must be between 0 and 5.")
    if not isinstance(mark, int):
        raise ValueError("Assignment mark must be an integer.")


# %% Object classes
class NoSubmission:
    """
    Class to represent no submission made.
    """

    def __init__(self):
        self.value = np.nan

    def __str__(self):
        return "No Submission"

    def __repr__(self):
        return "No Submission"


class StudentMarksEEEN11202:
    """
    Docstring for StudentMarksEEEN11202
    """

    def __init__(self, name, id):
        no_assignments = 20
        self.name = name
        self.id = id
        self.assignment_marks = np.full((no_assignments,), NoSubmission())
        self.exam_mark = NoSubmission()
        self.overall_mark = NoSubmission()

    def set_exam_mark(self, mark):
        check_exam_mark_validity(mark)
        self.exam_mark = mark
        self._set_overall_mark()

    def set_assignment_mark(self, assignment_letter, mark):
        check_assignment_mark_validity(mark)
        index = ord(assignment_letter.lower()) - ord("a")  # adjust for 0-based indexing
        self.assignment_marks[index] = mark
        self._set_overall_mark()

    def _set_overall_mark(self):
        assignment_weight = 0.5
        exam_weight = 0.5

        # Set exam to zero if no submission
        tmp_exam_mark = self.exam_mark
        if isinstance(tmp_exam_mark, NoSubmission):
            tmp_exam_mark = 0

        # Set assignments to zero if no submission, and sum
        tmp_assignment_mark = 0
        for assignment_mark in self.assignment_marks:
            if isinstance(assignment_mark, NoSubmission):
                tmp_assignment_mark += 0
            else:
                tmp_assignment_mark += assignment_mark

        # Calculate overall mark
        self.overall_mark = (
            assignment_weight * tmp_assignment_mark + exam_weight * tmp_exam_mark
        )

        return self.overall_mark
Further modify
my_classes.pyto catch and handle any exceptions that are raised when setting marks. These should be corrected with the rules:Any exam marks above 100 or below 0 should be set to 100 or 0 respectively.
Any assignment marks above 5 or below 0 should be set to 5 or 0 respectively.
Any non-integer marks should be rounded to the nearest integer.
Any non-numeric marks should cause the code to terminate and display a message to the user (not the full traceback).
Solution
import sys

import numpy as np

# %% Define constants for valid mark ranges
EXAM_MARK_MIN = 0
EXAM_MARK_MAX = 100
ASSIGNMENT_MARK_MIN = 0
ASSIGNMENT_MARK_MAX = 5


# %% Set up custom exceptions and error checking functions
# These are called from the object classes below
class MarkIsText(Exception):
    """Error with exam mark not being a number"""

    pass


class ExamMarkOutOfRange(Exception):
    """Error with exam mark not being between 0 and 100"""

    pass


class AssignmentMarkOutOfRange(Exception):
    """Error with assignment mark not being 0, 1, 2, 3, 4, or 5"""

    pass


def check_exam_mark_validity(mark):
    if isinstance(mark, str):
        raise MarkIsText("Exam mark must be a number.")
    if mark < EXAM_MARK_MIN or mark > EXAM_MARK_MAX:
        raise ExamMarkOutOfRange(
            f"Exam mark must be between {EXAM_MARK_MIN} and {EXAM_MARK_MAX}."
        )
    if not isinstance(mark, int):
        raise ValueError("Exam mark must be an integer.")


def check_assignment_mark_validity(mark):
    # This is basically the same as check_exam_mark_validity() but with different valid ranges
    # Probably better to put both into a single function with parameters, but this is clearer for now
    if isinstance(mark, str):
        raise MarkIsText("Exam mark must be a number.")
    valid_marks = range(
        ASSIGNMENT_MARK_MIN, ASSIGNMENT_MARK_MAX + 1
    )  # end value not included, so is 6 rather than 5
    if mark not in valid_marks:
        raise AssignmentMarkOutOfRange(
            f"Assignment mark must be between {ASSIGNMENT_MARK_MIN} and {ASSIGNMENT_MARK_MAX}."
        )
    if not isinstance(mark, int):
        raise ValueError("Assignment mark must be an integer.")


# %% Object classes
class NoSubmission:
    """
    Class to represent no submission made.
    """

    def __init__(self):
        self.value = np.nan

    def __str__(self):
        return "No Submission"

    def __repr__(self):
        return "No Submission"


class StudentMarksEEEN11202:
    """
    Docstring for StudentMarksEEEN11202
    """

    def __init__(self, name, id):
        no_assignments = 20
        self.name = name
        self.id = id
        self.assignment_marks = np.full((no_assignments,), NoSubmission())
        self.exam_mark = NoSubmission()
        self.overall_mark = NoSubmission()

    def set_exam_mark(self, mark):
        try:
            check_exam_mark_validity(mark)
        except MarkIsText as e:
            print(
                f"Error setting exam mark. Asked for value: {mark}. It should be a number."
            )
            sys.exit(1)  # stops the program
        except ValueError:
            mark = round(mark)
            self.set_exam_mark(mark)  # try to set again with new mark
        except ExamMarkOutOfRange:
            if mark < EXAM_MARK_MIN:
                mark = EXAM_MARK_MIN
            else:
                mark = EXAM_MARK_MAX
            self.set_exam_mark(mark)  # try to set again with new mark
        else:
            self.exam_mark = mark
            self._set_overall_mark()

    def set_assignment_mark(self, assignment_letter, mark):
        try:
            check_assignment_mark_validity(mark)
        except MarkIsText as e:
            print(
                f"Error setting assignment mark. Asked for value: {mark}. It should be a number."
            )
            sys.exit(1)  # stops the program
        except ValueError:
            mark = round(mark)
            self.set_assignment_mark(
                assignment_letter, mark
            )  # try to set again with new mark
        except AssignmentMarkOutOfRange:
            if mark < ASSIGNMENT_MARK_MIN:
                mark = ASSIGNMENT_MARK_MIN
            else:
                mark = ASSIGNMENT_MARK_MAX
            self.set_assignment_mark(
                assignment_letter, mark
            )  # try to set again with new mark
        else:
            index = ord(assignment_letter.lower()) - ord(
                "a"
            )  # adjust for 0-based indexing
            self.assignment_marks[index] = mark
            self._set_overall_mark()

    def _set_overall_mark(self):
        assignment_weight = 0.5
        exam_weight = 0.5

        # Set exam to zero if no submission
        tmp_exam_mark = self.exam_mark
        if isinstance(tmp_exam_mark, NoSubmission):
            tmp_exam_mark = 0

        # Set assignments to zero if no submission, and sum
        tmp_assignment_mark = 0
        for assignment_mark in self.assignment_marks:
            if isinstance(assignment_mark, NoSubmission):
                tmp_assignment_mark += 0
            else:
                tmp_assignment_mark += assignment_mark

        # Calculate overall mark
        self.overall_mark = (
            assignment_weight * tmp_assignment_mark + exam_weight * tmp_exam_mark
        )

        return self.overall_mark
Optional task (no solution provided). Add logging statments so that any changes to marks are logged to a file so there is a record. (In practice we’d probably error out if we got any issues processing student marks rather than automatically correcting and logging as here, but there might be cases where an automatic correction, with a log of the correction, is appropriate.)